How to use Proton VPN with the OpenVPN GUI on Windows
- Reading
- 5 mins
- Category
- Windows
For the best Proton VPN experience on Windows, we strongly recommend using our official Windows app. Features include:
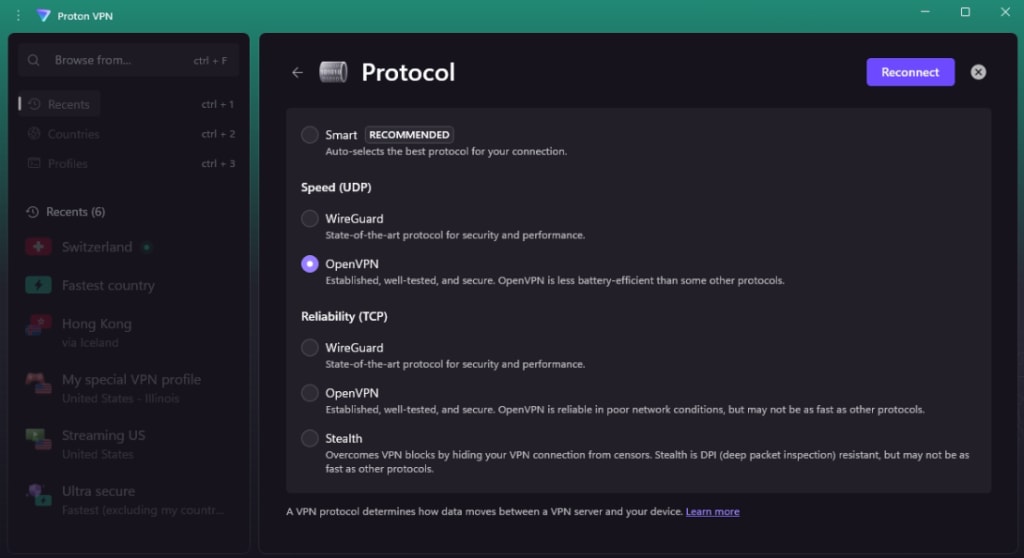
- Choice of OpenVPN (UDP or TCP) or WireGuard®protocols
- Smart Protocol to choose the best VPN protocol for your needs
- Connection profiles
- Kill switch
- Permanent kill switch
- Alternative routing(new window)
- VPN Accelerator
- Split tunneling
Download the Proton VPN for Windows
It is also possible to configure third-party VPN apps, although doing so means many of the advanced features in our app will not be available.
In this article, we look at how to manually configure the OpenVPN GUI app on Windows. This is the official community-developed, open-source OpenVPN app. Please note that this is not the OpenVPN Connect app developed by OpenVPN Technologies Inc.
How to manually configure OpenVPN on Windows
To manually configure OpenVPN on Windows using OpenVPN GUI:
- Find out your OpenVPN login credentials
- Download the required OpenVPN configuration files to your PC
- Configure OpenVPN GUI using the downloaded config files
Find out your OpenVPN username and password
Your OpenVPN username and password are different to your Proton VPN account username or password.
To find them, log in to account.protonvpn.com and go to Account→ OpenVPN username.
If you would like to use our NetShield DNS filtering feature, append the suffix +f1 to your username to block malware, or +f2 to block malware, ads, and trackers (for example, 123456789+f2).
Learn more about how to sign in to Proton VPN
Download the required OpenVPN configuration files
Log in to account.protonvpn.com and go to Downloads→ OpenVPN configuration files. Then:
1. Select platform (choose Windows)
2. Select protocol. Choose between OpenVPN UDP or OpenVPN TCP. UDP is faster and recommended in most situations, while TCP is more reliable and can bypass some censorship measures.
Learn more and whether to choose UDP or TCP
3. Select config file and download. Select the type of config file you wish to download. The list of available files will dynamically change based on the type you select. Click the Action→ Download button next to the specific config file you want.
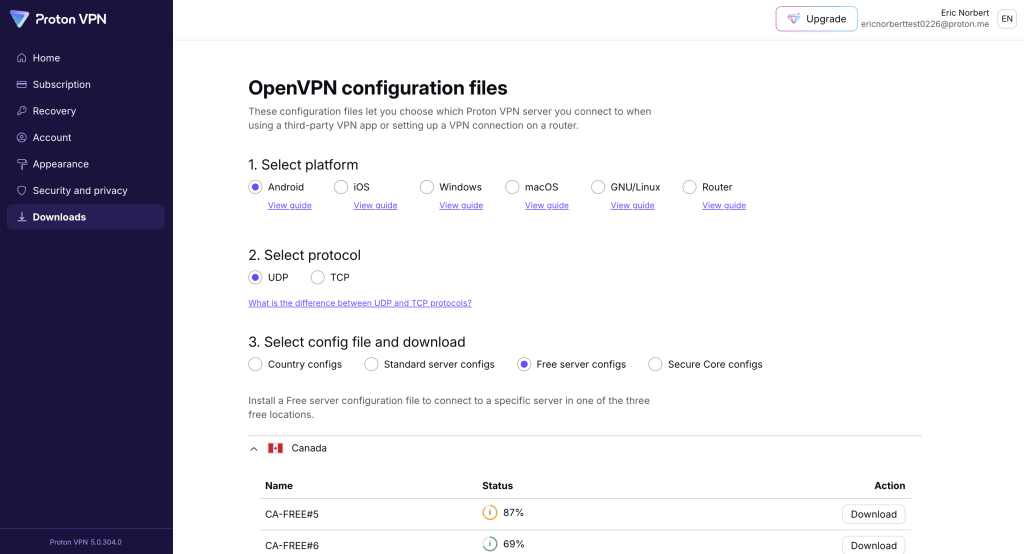
- Secure core — our special Secure Core VPN servers. Choose the exit location and the Secure Core server (via) that your connection will be routed through.
- Country — will automatically connect you to a server in the selected country.
- Standard server — specify an individual server, sorted by country. In the Status column, Plus servers are marked with a P, P2P servers are marked with a double-arrow icon, and Tor servers are marked with an onion icon.
- Free server — servers available to users of our Free plan.
Setup Proton VPN using OpenVPN GUI
1. Download and install the correct OpenVPN GUI MSI install file for your PC from here(new window) (remember, this is different program to the OpenVPN Connect app).
2. Run OpenVPN GUI. An icon for it will appear in your Windows taskbar notification area (sometimes called the system tray. You may need to click the Show hidden icons arrow ∧ to see it). Right click on the icon and go to Import → Import file…

3. Navigate to where you downloaded the OpenVPN configuration file (probably your Downloads folder), select it, and click Open.
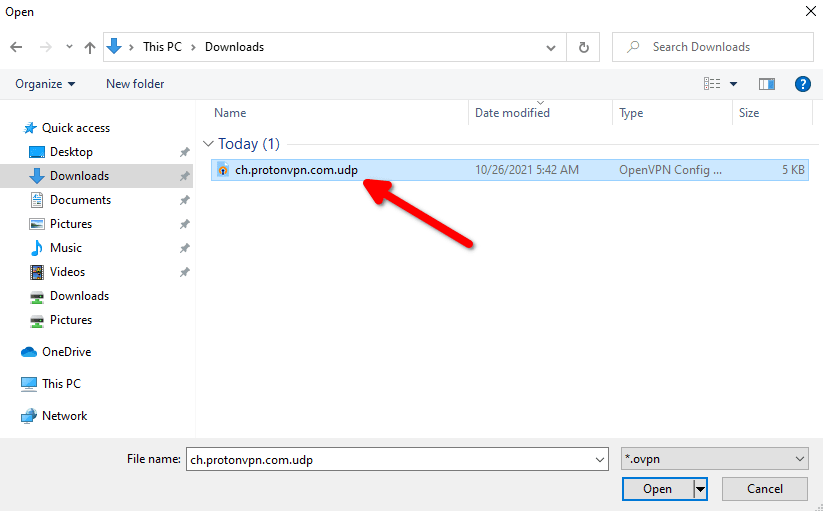
Click OK at the File imported successfully message.
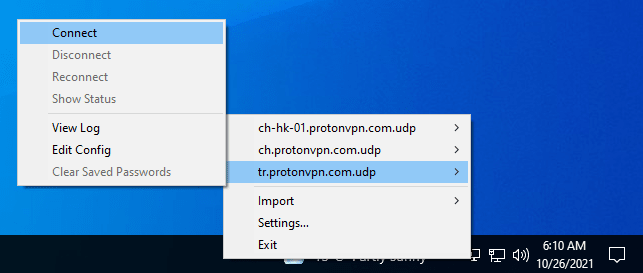
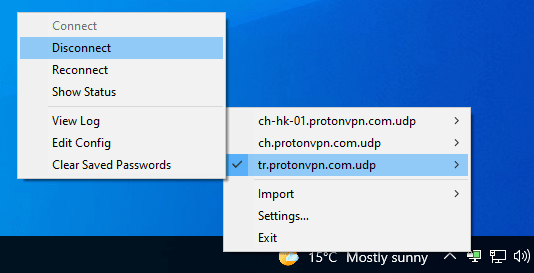
4. Right click the OpenVPN GUI icon in your notification area → Connect.

You can import up to 50 OpenVPN profiles into OpenVPN GUI. If you have imported multiple profiles, right click the OpenVPN GUI icon in your notification area → hover over the profile you would like to use → Connect.
5. Enter your OpenVPN username and password (not your account username and password — see above).

OpenVPN passwords are very secure (i.e., long) so we recommend that you check the Save password box to log in easily each time. Click OK.
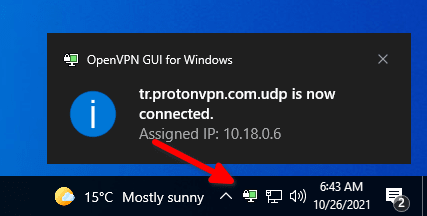
A Windows notification will alert you when the connection is successfully established and the OpenVPN GUI icon in your notification area will turn green.
To disconnect from the VPN, right click the OpenVPN GUI icon in your notification area → Disconnect (or right click the OpenVPN GUI icon in your notification area → hover over the profile you are connected to → Disconnect if you have imported multiple profiles).
Related Articles
Solutions to Authentication Failures
How to install the Proton VPN Client on Windows