DNS leaks when using a VPN
- Reading
- 10 mins
- Category
- Connection
All Proton VPN apps include DNS leak protection designed to prevent websites and the like that you visit on the internet from identifying your real DNS address. There are some limited circumstances, however, that allow your computer to bypass these protections that can result in third parties being able to see the IP address of the DNS server you are really using.
In this article, we explain what DNS is, how it works, and why manually configuring your DNS settings can prevent our DNS leak protection from working correctly.
What is DNS?
Every connection to the internet is assigned a unique numerical identifier known as an internet protocol (IP) address. The human brain is not designed to remember long strings of numbers, so we identify internet resources (such as websites and games servers) using more human-friendly text strings known as domain names.
The Domain Name System (DNS) is like a global telephone directory that translates human-friendly URLs to the IP addresses that computers use.
So, for example, if the URL example.com has the IP address 123.456.789.012, entering 123.456.789.012 into your browser’s web address bar would take you to example.com. (In practice, an IP address can map to multiple websites, and a single domain can map to multiple IP addresses. But in essence, this is what DNS does.)
DNS and privacy
DNS resolution is the process of translating a domain into its matching IP address. It is performed by DNS servers, which by default are operated by your internet service provider (ISP).
Almost all ISPs in the world keep logs of DNS queries made by their customers, allowing them to know your browsing history. Although ISPs can track your internet activity in other ways, most confine themselves to simply keeping DNS logs.
Although not usually done by default, it is possible for websites that you visit to see the IP address of the DNS server used to resolve the DNS query that directs you to their site. Armed with this knowledge, they (or anyone else watching the website) can then approach your ISP and ask it to reveal the IP address of whichever customer made the DNS query.
Because DNS resolution is performed by your ISP, knowing the IP address of the DNS server you used allows websites to identify which country you are in. If you are using a VPN(new window) or proxy to hide your real IP address, but your ISP’s DNS server IP address is exposed, then this mismatch can allow websites to know that you are trying to mask your real identity.
DNS, Proton VPN, and DNS leak protection
Proton VPN addresses this threat by running our own DNS servers. As with all other internet traffic, DNS queries are routed through the VPN tunnel to be resolved on our servers.
To the outside world, your DNS address will differ from the IP address of your VPN server, but it will belong to the same data center. It will therefore closely match the VPN server’s physical location. (Note that IPv6 connections are simply blocked at this time, which has no effect on your internet experience.)
Proton VPN does not log DNS queries, and by Swiss law cannot be forced to start logging them. We also do not log the IP addresses of our users.
Learn more about Proton VPN’s threat model
All our apps implement DNS leak protection, using firewall(new window) rules and other platform-specific techniques to ensure no internet traffic – including DNS queries – can enter or exit your device outside the VPN interface.
However, there are a limited number of circumstances where DNS queries might be routed outside the VPN tunnel.
Third-party DNS services
Manually configuring your device’s global DNS settings to use a third-party DNS service, such as Google Public DNS, Cloudflare, or OpenNIC, increases the chance of something going wrong, as it is possible the custom settings will override our DNS leak prevention measures.
We therefore strongly recommend against using third-party DNS services with Proton VPN. Below are guides to disabling custom DNS configurations on all major platforms.
Windows 10
1. Go to Start → Settings → Network & Internet → your network interface (e.g. WiFi or Ethernet) → Related settings → Change adapter options.
2. Right-click on your network interface → Properties → Internet Protocol Version 4 (TCP/IPv4) → Properties.

3. Ensure Obtain DNS server addresses automatically is selected, then click OK.
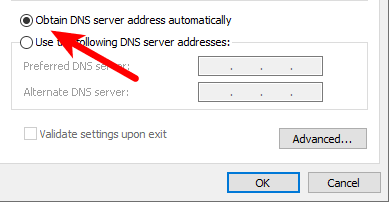
4. If you have an IPv6 connection (or if you’re not sure if you do), repeat steps 2 and 3 for Internet Protocol Version 6 (TCP/IPv6).
macOS
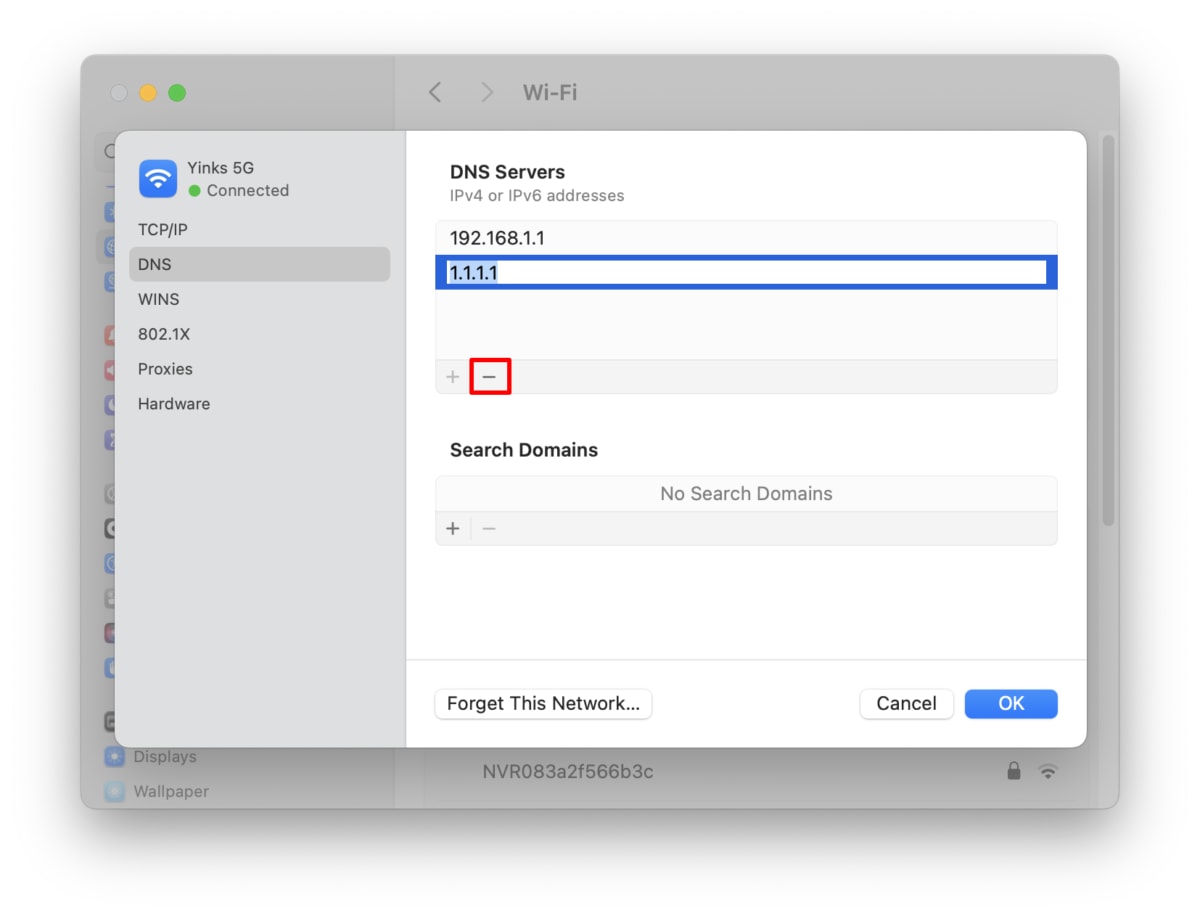
Open the Settings app and go to Network → select your network interface (e.g., WiFi or Ethernet) → Details… → DNS tab. Select any third-party DNS servers (if there are any), then click the – button to remove them. Click OK when you’re done.
Linux
Each Linux distro and desktop environment offers a different (although often very similar) user interface for changing DNS settings. In Ubuntu GNOME, for example:
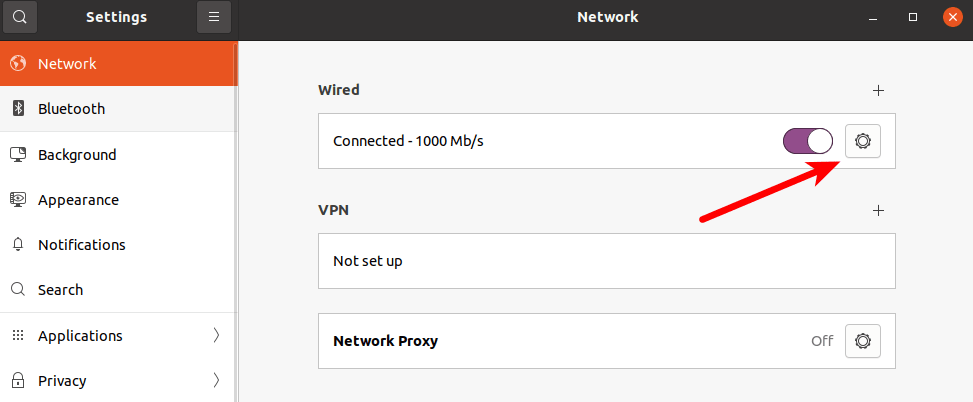
1. Go to Show Applications → All → Settings → Network and click the gear icon next to your network interface.
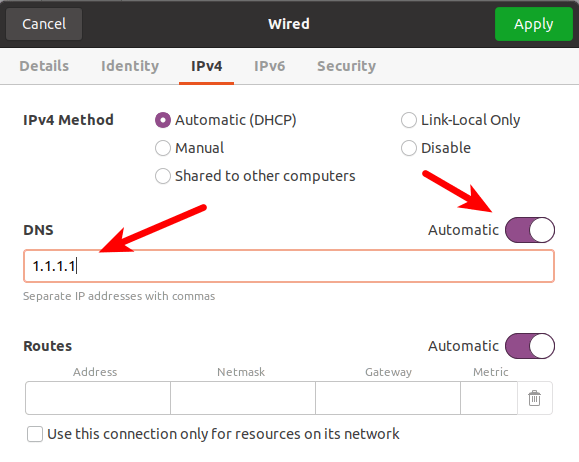
2. Go to the IPv4 and IPv6 tabs. Under DNS, ensure the Automatic switch is toggled on and delete any DNS entries you see. Click Apply when you’re done.
Android 9+
Android 9+ offers Private DNS, a system-wide feature that automatically protects the connection to your ISP’s DNS servers using DoT (if this is supported by your ISP – see below for more details), or that allows you to specify a custom DNS provider. To disable Private DNS:
1. Open the Settings app and go to Connections → More connection settings → Private DNS → Off.

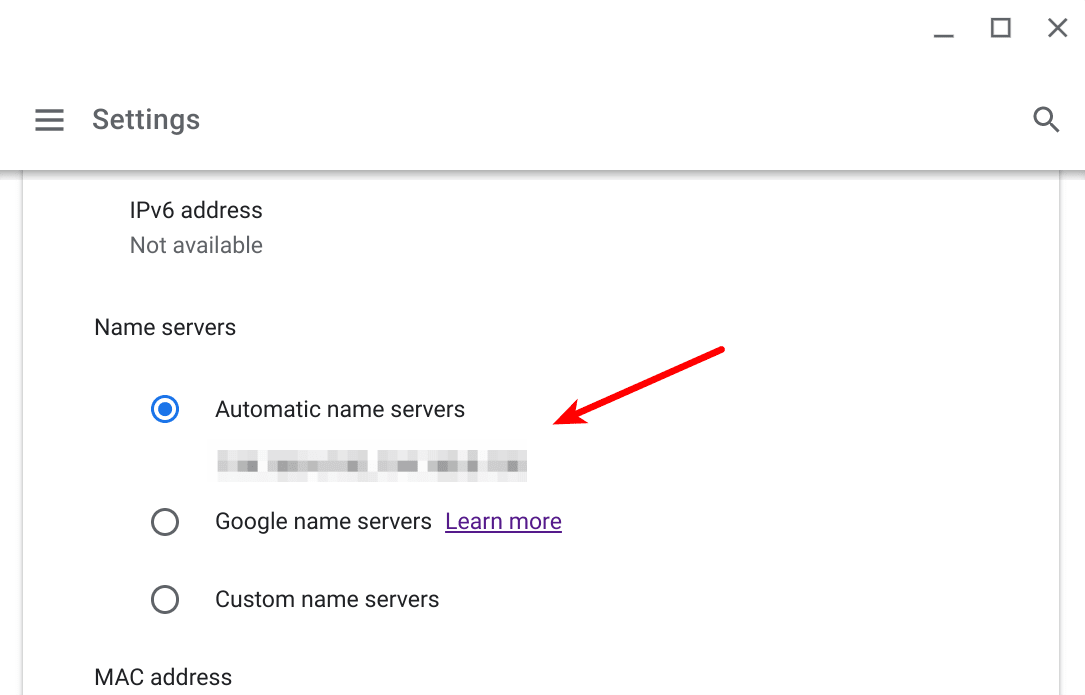
Chrome OS
Go to Settings → select your network interface (e.g. WiFi or Ethernet. If using WiFi you will also need to select a known network) → Advanced → Name servers and ensure Automatic name servers is selected.
iOS and older versions of Android
The only way to change the global DNS settings in iOS/iPadOS and Android versions earlier than Android 9 Pie is to use a third-party app that creates a dummy VPN interface to work.
Since it is only possible to have one VPN connection at a time, you can’t run these apps alongside Proton VPN anyway.
DNS over HTTPS
DNS over HTTPS(new window) (DoH) is an encryption standard that encrypts DNS queries to the DNS server. DoH only works if the standard is supported by the DNS provider, but is now offered by an increasing number of third-party DNS services (although rarely by ISPs).
Unfortunately, this compounds the problem with using third-party DNS services because the encryption prevents our software from being able to see the DNS queries. This makes it very hard to block or reroute them.
We therefore strongly recommend against using DoH (and the similar DNS over TLS standard) with Proton VPN. When using our apps, all DNS queries are sent through the VPN connection to our servers, and are thus securely encrypted without the need for DoH or DoT.
On desktop systems, DoH is usually implemented inside your browser, and is supported by most modern browsers (except Safari). DoH and DoT are supported on mobile devices via Android Private DNS or standalone apps (as described above).
How to disable DoH in your desktop browser
Firefox
Go to ≡ → Settings → Privacy & Security → DNS over HTTPS → Enable secure DNS using: and select off.

Chrome
Click the three-dot vertical ellipse icon → Settings → Privacy and Security → Privacy and security → Security → Advanced → Select DNS provider and ensure OS default (when available) is selected form the dropdown menu.
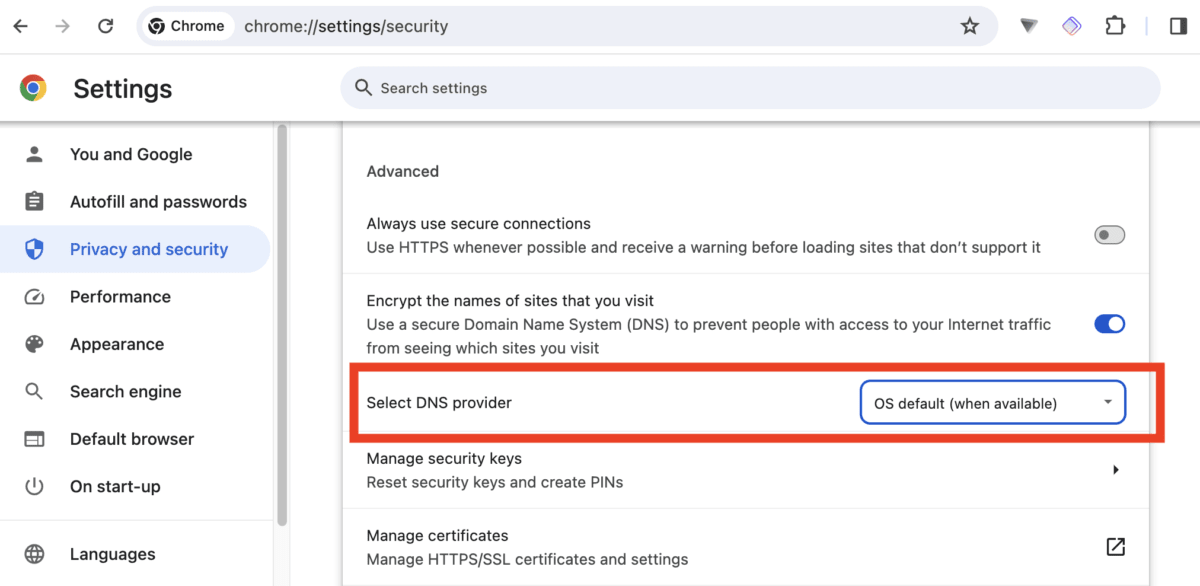
(On a Chromebook, go to Settings → Privacy and security → Advanced)
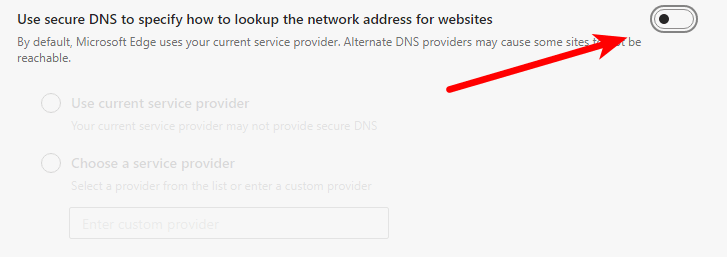
Edge Chromium
Click the three-dot horizontal ellipse icon → Settings → ≡ → Privacy, search, and services → Security and ensure Use secure DNS to specify how to lookup the network address for websites is off.
Brave
Go to ≡ → Settings → Privacy and Security→ → Security→ Advanced and ensure Use secure DNS is off.

Your connection to the VPN server is interrupted
If the connection between your device and the VPN server is interrupted, you might access the internet without the protection of the VPN. Among other things, this means DNS queries might be sent to your system’s default DNS server (which is probably run by your ISP).
This issue is easy to address by enabling the kill switch feature, which is now available in all our apps.
How to check for DNS leaks
1. Open our app and connect to one of our servers. For the purpose of running a DNS leak test, connecting to a VPN in a different country makes DNS leaks easier to spot.
2. Visit DNSleaktest.com(new window) in your browser. You should see the IP address of the VPN server you have connected to. Choose either a Standard test or an Extended test. For the purposes of this guide, we’ll choose an extended test.
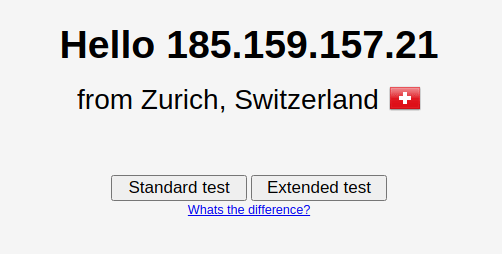
3. Wait for the test to complete and look at the results. If the IP address shown is that of your real ISP, then you have a DNS leak. Please see above for solutions.
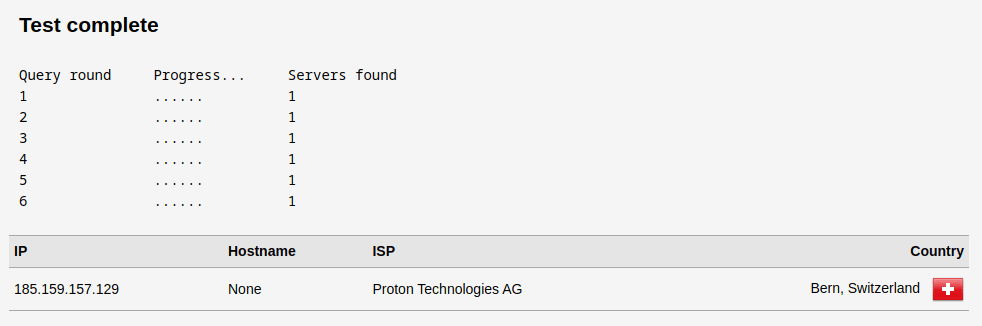
Note that Proton VPN partners with infrastructure providers around the world, so the ISP may be a third-party provider. As long as the IP address does not belong to your real ISP, you do not have a DNS leak.