How to set up Proton VPN on a DD-WRT router using OpenVPN
- Reading
- 3 mins
- Category
- Routers
You can set up Proton VPN on your router, which will protect every device that connects to the internet through that router. In this guide, we take a step-by-step look at how to set up Proton VPN on a DD-WRT router(new window) using the OpenVPN VPN protocol.
We also have guides for setting up Proton VPN on a wide selection of other popular routers.
Learn how to install Proton VPN on different routers
To skip this setup process, you can purchase a pre-configured router from FlashRouters(new window).
Before starting, you’ll need the following:
- A computer that’s connected to your LAN network so that you can access your DD-WRT router’s web interface(new window). To do this, enter the address provided by your router’s manufacturer into your browser’s URL bar. For example, most Linksys and Asus routers use the address 192.168.1.1.
- Your OpenVPN username and password. These are different from your regular Proton VPN username and password. To find them, sign in to account.protonvpn.com and go to Account → OpenVPN username.
Note that this guide is for newer versions of DD-WRT. If you’re running an older version of DD-WRT, please update your firmware(new window) to the latest version.
If you’re running an old version of DD-WRT that doesn’t support importing .ovpn files and you can’t update your router’s firmware, please see our old DD-WRT guide(new window).
How to set up Proton VPN on a DD-WRT router
1. Create an OpenVPN configuration file
Sign in to Proton VPN using your Proton Account username and password at account.protonvpn.com, go to Downloads → OpenVPN configuration files, and download an OpenVPN configuration file. Be sure to Select Platform: Router.
Learn how to download an OpenVPN configuration file from Proton VPN
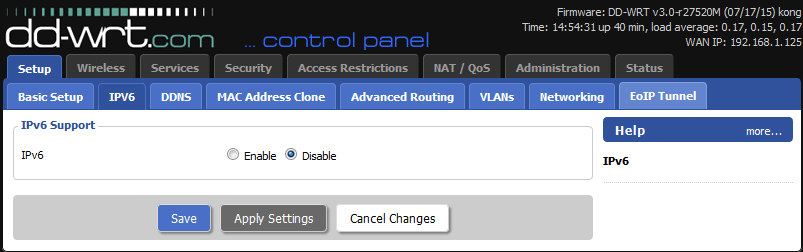
2. Disable IPv6 on your router
This step is recommended to prevent IP leaks.
Open your DD-WRT router’s web interface(new window) in a browser window. Go to Setup → IPV6 → IPV6 Support → IPV6 and toggle the Disable button on. Now click Save, then Apply Settings.
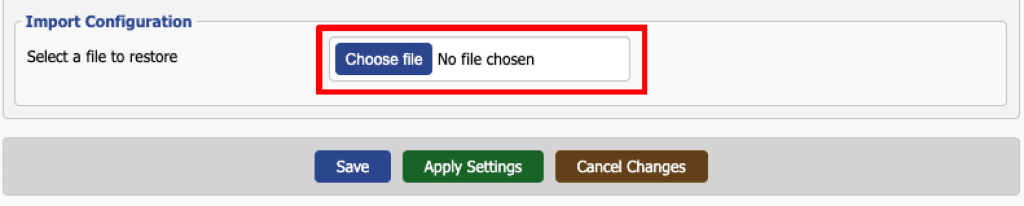
3. Configure the OpenVPN service
Go to Services → VPN → OpenVPN Client → Import Configuration → Select a file to restore → Choose file (at the bottom of the config screen) and use your system’s default manager to select the .ovpn file you downloaded in step 1. Click Apply Settings.
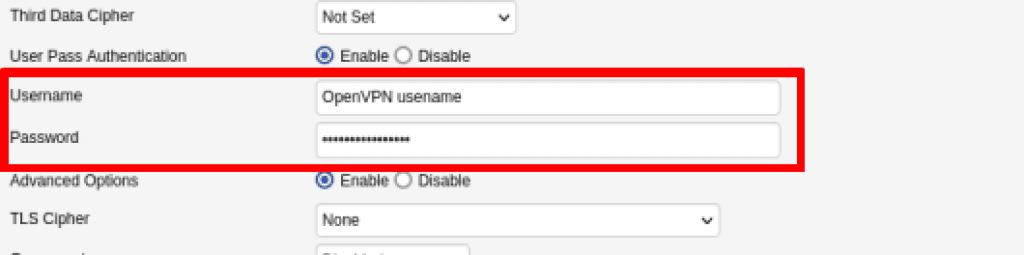
Enter your OpenVPN username and password. When you’re done, click Save, then Apply Settings.
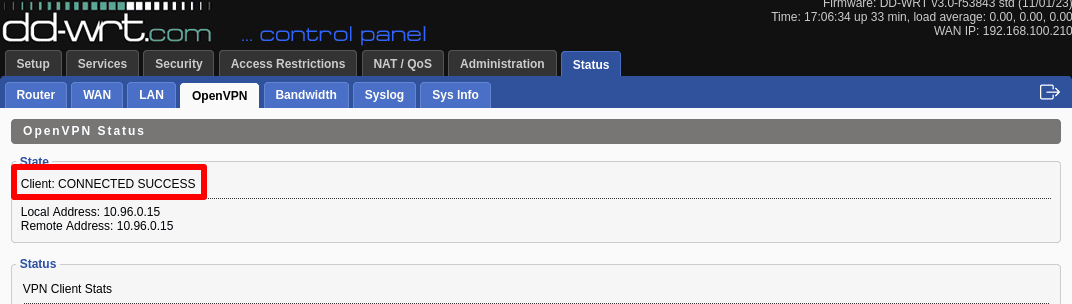
To verify the VPN is working, go to Status → OpenVPN → State. You should see the message: Client: CONNECTED SUCCESS.
You can also test if the VPN is working by visiting our free secure IP scanner(new window) from any device on your network.