How to configure Proton VPN on pfSense using OpenVPN
- Reading
- 14 mins
- Category
- Routers
In this guide, we show you how to set up Proton VPN on pfSense 23.09 and pfSense 2.7.x using the OpenVPN VPN protocol. This allows your router to protect any device connected to it with a Proton VPN connection.
If you’re using pfSense 2.7.x, we recommend using the WireGuard® protocol instead.
Note also that multiple connections are not recommended using OpenVPN. For this use case, we again recommend WireGuard.
Before starting, you’ll need:
- A fresh pfSense 23.09 or pfSense 2.7.x installation
- A computer connected to your LAN network so that you can access the pfSense frontend
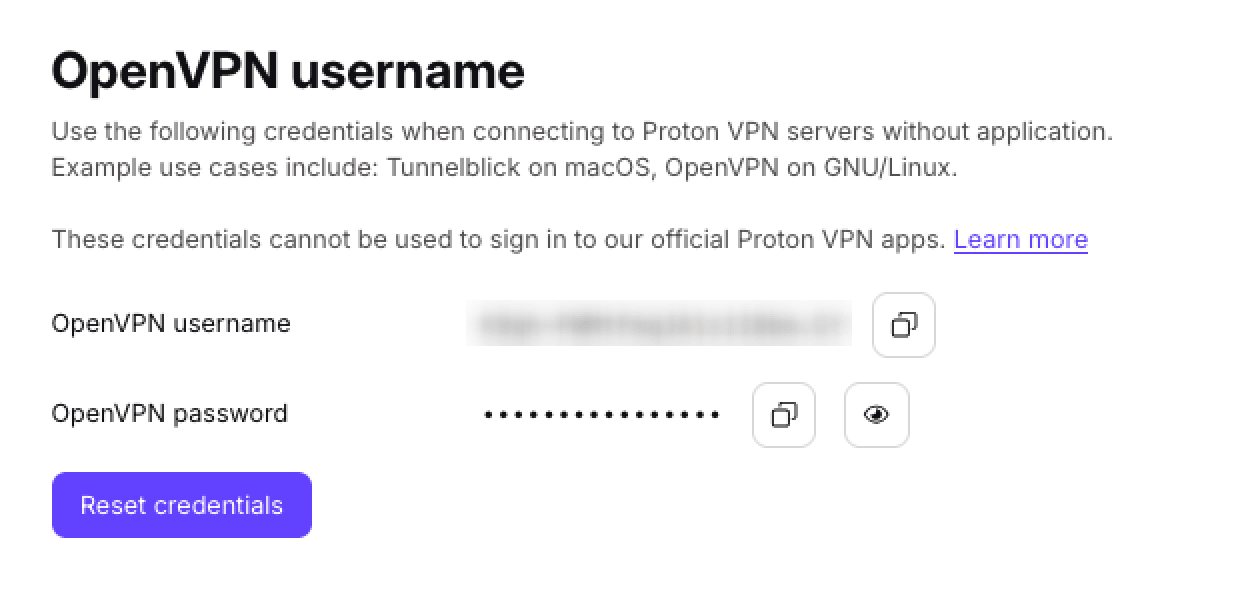
- Your OpenVPN username and password. These are different from your regular Proton VPN username and password. To find them, sign in to account.protonvpn.com and go to Account → OpenVPN username.
1. Create an OpenVPN configuration file
Sign in to Proton VPN using your Proton Account username and password at account.protonvpn.com, go to Downloads → OpenVPN configuration files, and download an OpenVPN configuration file. Be sure to Select Platform: Router.
Learn how to download an OpenVPN configuration file from Proton VPN
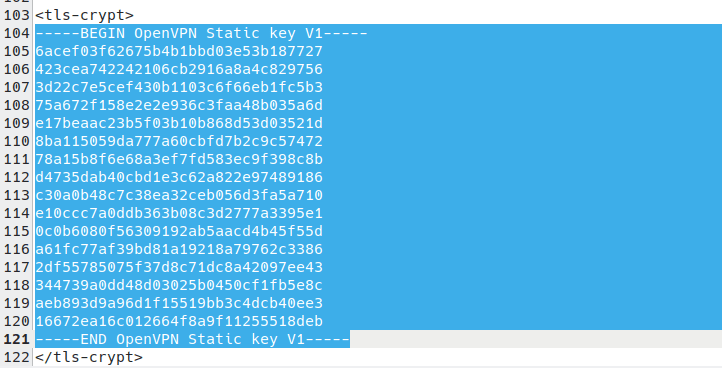
To configure pfSense, you’ll need the TLS certificate(new window) from this config file. To find it, open the downloaded OpenVPN config file in a text editor and look for the text that starts with —–BEGIN CERTIFICATE—- and ends with –—-END CERTIFICATE—–.

You’ll also need the IP address and port number of the VPN server. These can be found on the first remote line listed in the certificate. The first number is the IP address, and the second number is the port number. In the example below, the IP address is 185.159.157.6, and the port number is 51820

And finally, you’ll need the OpenVPN Static key. This starts with —–BEGIN OpenVPN Static key V1—- and ends with —–END OpenVPN Static key V1—–.
2. Add the TLS certificate to pfSense
Enter 192.168.1.1 into your browser’s URL bar to open the pfSense web interface. Sign in and go to System → Certificates → Add → Import certificate.
Configure the following settings:
Create / Edit CA. Go to Authorities → Add and change the following settings:
- Descriptive name: This can be any name that you find useful to describe Proton’s TLS certificate
- Method: Import an existing Certificate Authority
Existing Certificate Authority
- Copy the TLS certificate from your OpenVPN config file and paste in it here
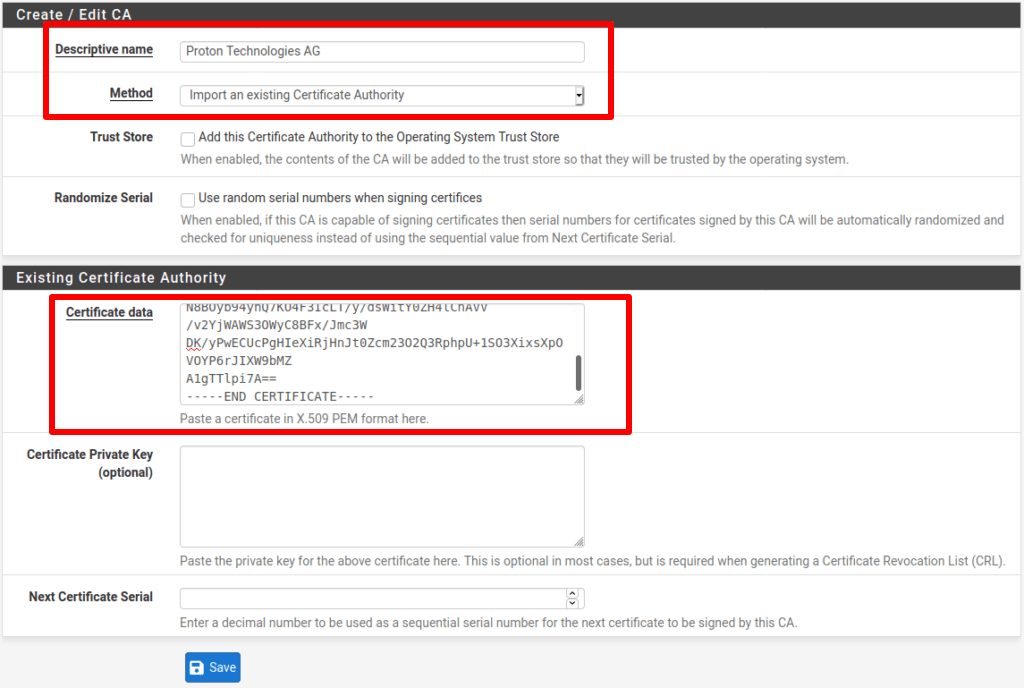
Click Save when you’re done.
3. Configure the OpenVPN Client
You’ll now add an OpenVPN client to encrypt your data and tunnel it to the VPN server.
Go to VPN → OpenVPN → Clients, click Add, and configure the following settings:
General Information:
- Description: Choose a display name for this configuration
- Disabled: Unchecked
Mode Configuration
- Server Mode: Peer to Peer (SSL/TLS)
- Device mode: tun – Layer 3 Tunnel Mode
Endpoint Configuration
- Protocol: Either UDP on IPv4 only or TCP on IPv4 only (your choice, but it needs to match the configuration file you downloaded). Learn more about UDP vs TCP.
- Interface: WAN
- Local Port: –
- Server host or address: Please refer to Step 1 to find this.
- Server port: Please also refer to Step 1 to find this.
- Proxy host or address: –
- Proxy port: –
- Proxy Authentication: none

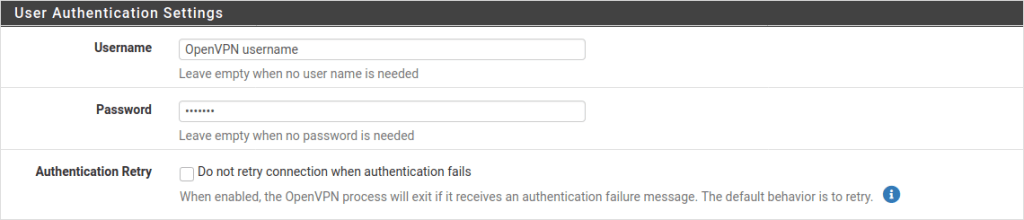
User Authentication Settings
- Username: Your Proton VPN OpenVPN username
- Password: Your Proton VPN OpenVPN password
- Authentication Retry: Leave unchecked
Remember: These are different from your regular Proton VPN username and password. To enable additional features, add the following suffixes to your OpenVPN username.
- NetShield Ad-blocker: +f1
- NetShield Ad-blocker advanced (available only if you have a paid plan, also blocks malware and trackers): +f2
For example, to enable NetShield Ad-blocker, enter username+f1.
Cryptographic Settings
- Use a TLS Key: Checked
- Automatically generate a TLS Key: Unchecked
- TLS Key: Paste in the OpenVPN Static key from the OpenVPN configuration file (see Step 1)
- TLS Key Usage Mode: TLS Encryption and Authentication
- TLS keydir direction: Use default direction
- Peer Certificate Authority: Proton AG (or the descriptive name you used in Step 2)
- Peer Certificate Revocation List: Leave unchanged
- Client Certificate: None (Username and/or Password required)
- Data Encryption Negotiation: Checked
- Data Encryption Algorithms: AES-256-GCM, CHACHA20-POLY1305
- Fallback Data Encryption Algorithm: AES-256-GCM
- Auth digest algorithm: SHA256 (256-bit)
- Hardware Crypto: Whether this is supported depends on your device. If it is supported, it must first be enabled by going to System → Advanced → Miscellaneous. If in doubt, select No hardware crypto acceleration.
- Server Certificate Key Usage Validation: Checked

Tunnel Settings
- IPv4 Tunnel Network: –
- IPv6 Tunnel Network:-
- IPv4 Remote network(s): –
- IPv6 Remote network(s): –
- Limit outgoing bandwidth: – (unless you prefer otherwise)
- Allow Compression: Refuse any non-stub compression (Most secure)
- Topology: Subnet — One IP address per client in a common subnet
- Type of service: Leave unchecked
- Don’t pull routes: Check
- Don’t add/remove routes: Leave unchecked
- Pull DNS: Check

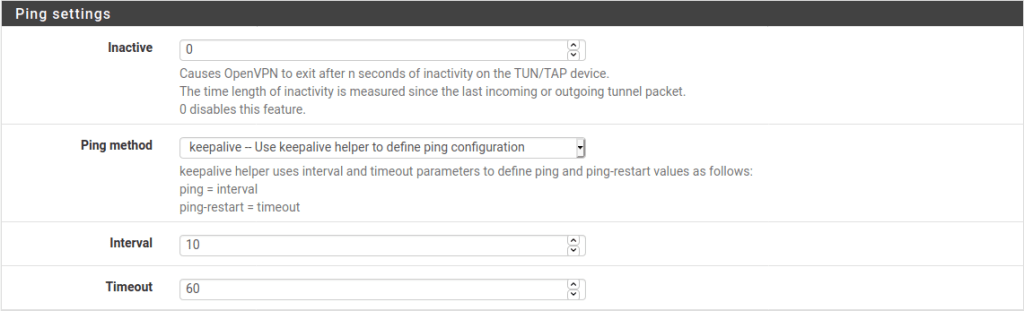
Ping Settings
- Leave everything at their default values.
Advanced Configuration
- Custom Options: Add the following:
tun-mtu 1500;
mssfix 0;
reneg-sec 0;
remote-cert-tls server;
Note: these configuration settings replace those shown in the screenshot below.
To improve the reliability of the connection, open the OpenVPN config file you downloaded with a text editor and locate the lines beginning with remote. From the second remote line down, copy each line beginning with remote to the Custom Options field in pfSense, followed by a semicolon.

- UDP Fast I/O: Checked
- Exit Notify: Disabled
- Send/Receive Buffer: Default
- Gateway creation: IPv4 only
- Verbosity level: 3 (recommended)

Click Save and go to Status → OpenVPN. You should see the new VPN client with its Status showing up.

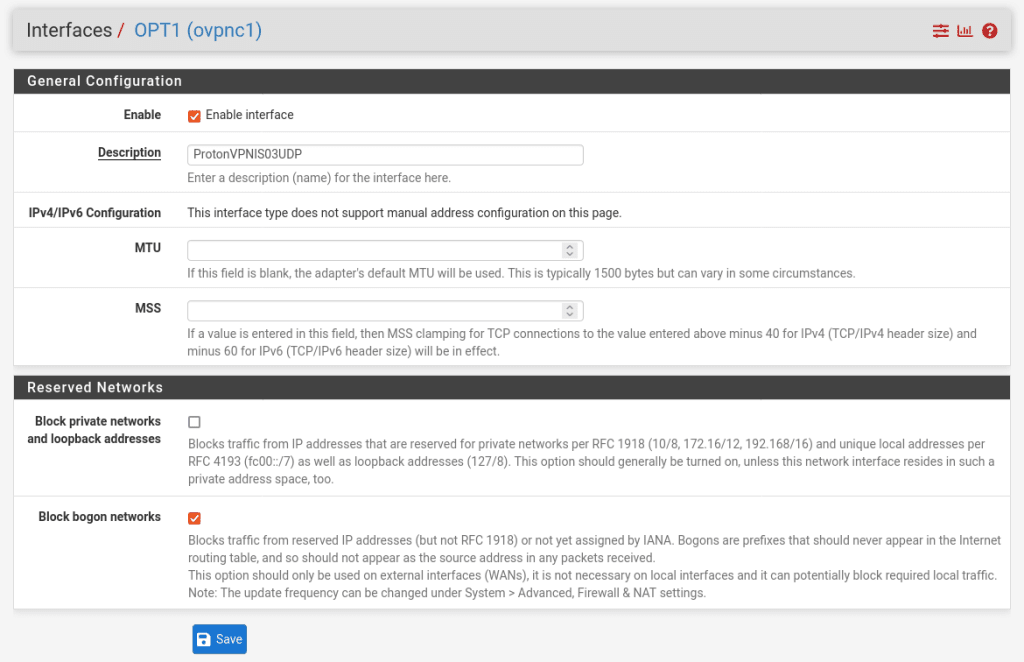
4. Configure the OpenVPN Interface
The VPN client is now running, but no traffic is being routed through it. To route all your network traffic through the secure Proton VPN tunnel, you’ll need to configure the interfaces and firewall rules.
Go to Interfaces → Interface Assignments → Available network ports and select the VPN client you just added from the dropdown menu → Add.
This will create an interface named OPTx (where x depends on how many physical interfaces your router has). Click on the newly created one to configure it.

Go to Interfaces tab, click on OPTx and enter the following configuration settings·
General Configuration:
- Enable: checked
- Description: Choose a descriptive name for the interface
Reserved networks:
- Block bogon networks: Check
Leave the rest of the fields unchanged.
Click Save and Apply Changes.
5. Configure firewall rules
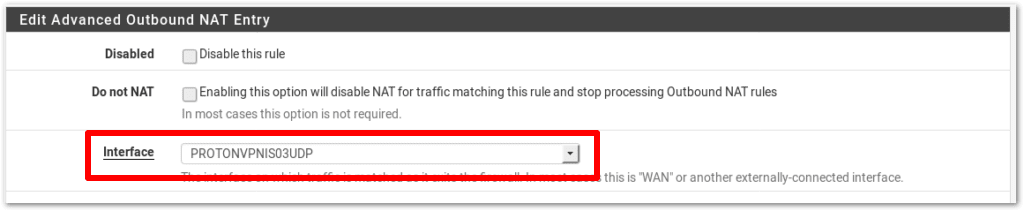
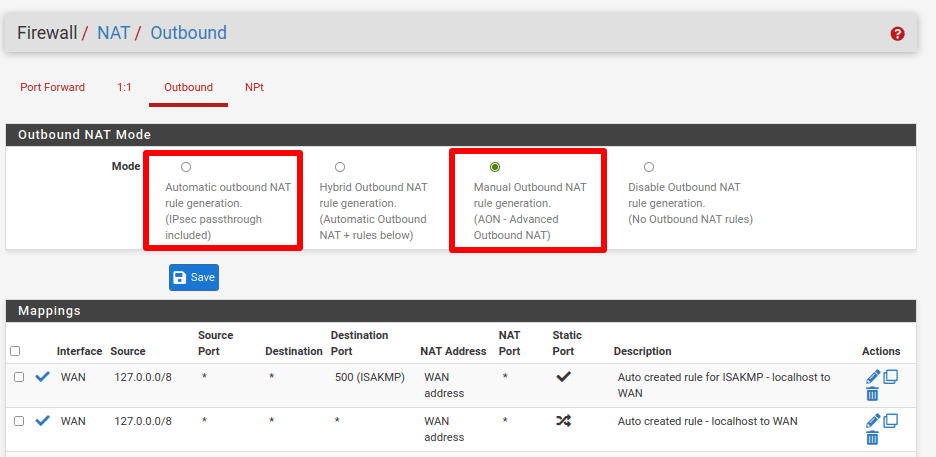
We use firewall rules to route all traffic through the Proton VPN interface we just set up. Go to Firewall → NAT → Outbound and select Manual Outbound NAT rule generation. Then click Save and Apply Changes.
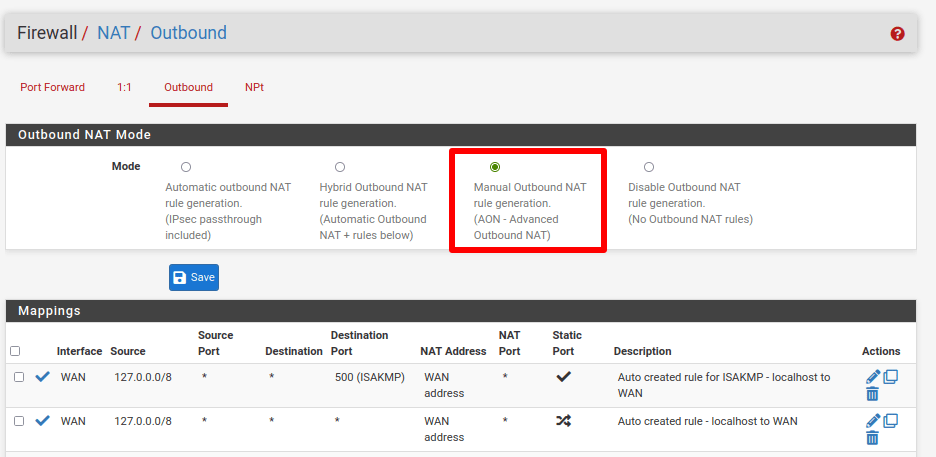
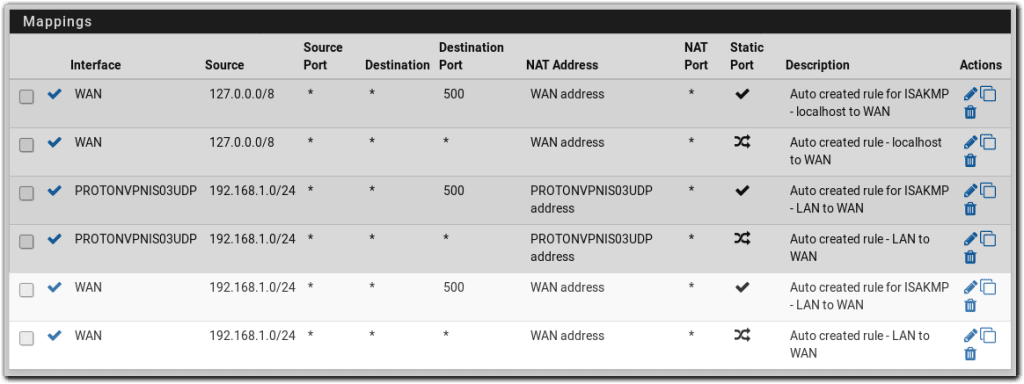
Under Mappings, you’ll see six rules listed. In the Source column, 4 of these rules show the addresses 127.0.0.0/8 and ::1/128. Ignore these and Edit (click the pencil icon in the Actions column) the other two rules.
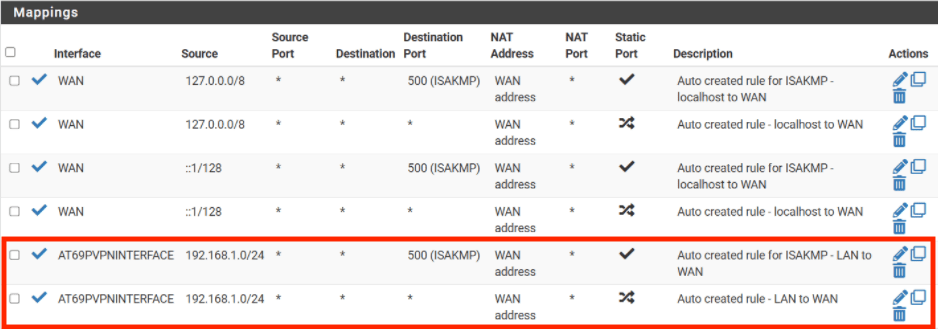
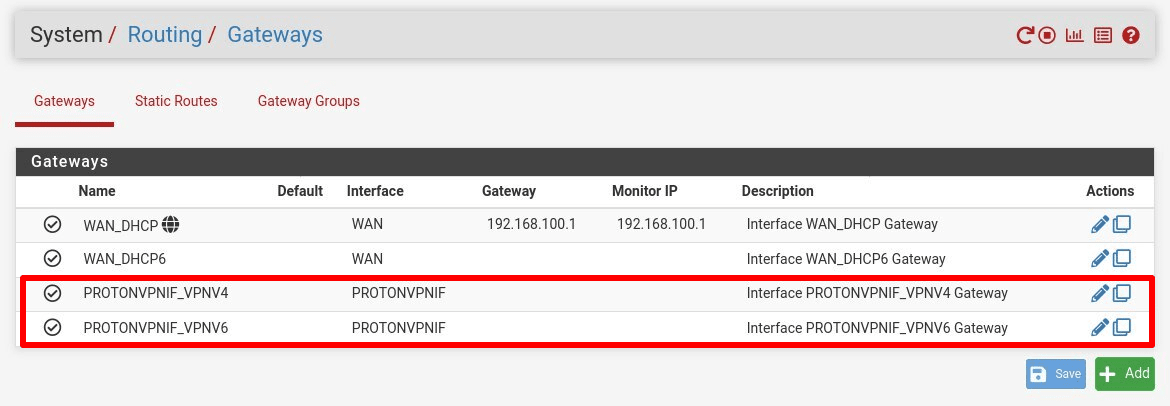
For both rules, change Interface to the Proton VPN Interface you created in Step 4. Click Save and Apply Changes.
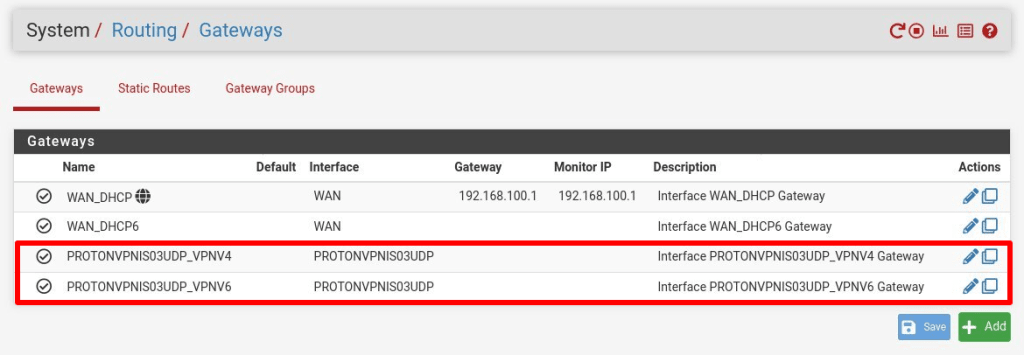
Note: this automatically also creates a gateway with the same name as the interface.
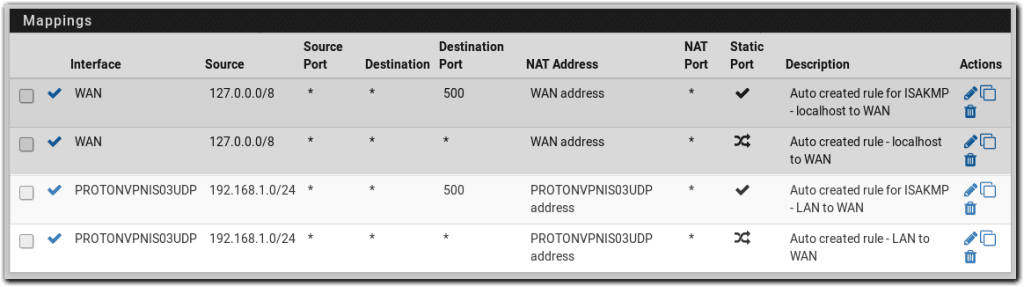
Mappings settings should now look like this:
Go to Firewall → Rules → LAN. Click the ✓ icon next to Default allow LAN IPv6 to any rule to disable it.
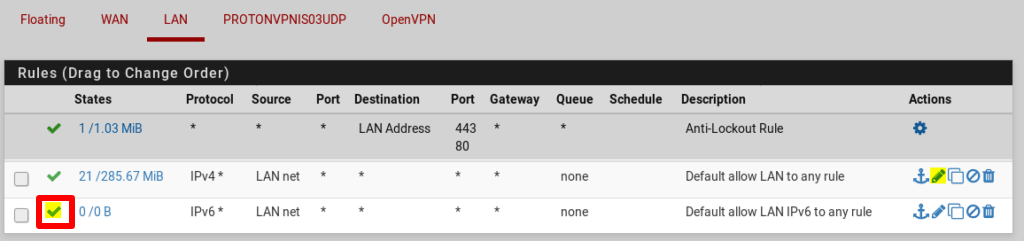
Go to Default allow LAN to any rule → Edit (pencil icon).
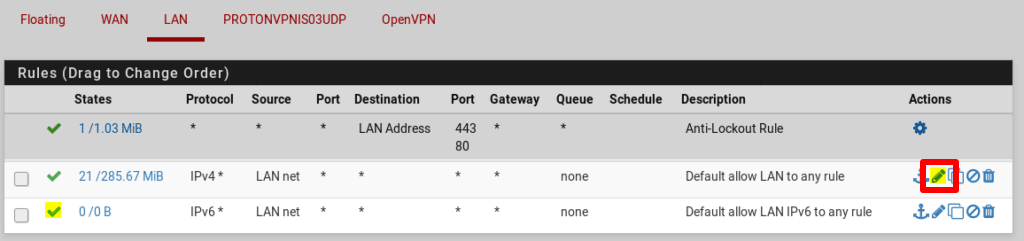
Click Display advanced → Gateway and select the gateway we created in Step 5. Click Save and Apply Changes.

Now go to Status → OpenVPN and click the Service → Restart icon to restart the OpenVPN client with the new settings.

Configure DNS settings
All internet traffic passing through the pfSense firewall will now be routed through a Proton VPN server. However, DNS requests are not. To fix this, we need to change the DNS settings in pfSense.
Go to System → General Setup → DNS Servers → DNS servers and enter the following settings:
- DNS Servers → Address: 10.2.0.1
- DNS servers → Gateway: select the VPN interface you created in Step 4
- DNS Server Override: check
- DNS Resolution Behavior: Use remote DNS Servers, ignore local DNS

Now go to Services → DNS Resolver → Outgoing Network Interfaces and enter the following settings:
- Outgoing Network Interfaces: select the VPN interface you created in Step 4
- DNS Query Forwarding: check
If you’ve enabled our NetShield Ad-Blocker feature by adding the +f1 or +f2 suffixes to your OpenVPN username (see Step 3), you must disable DNSSEC support.

Click Save and Apply changes.
Your setup is now complete. All traffic from your network should now be securely routed through the Proton VPN server you chose. You can test this by visiting our free secure IP scanner from any device on your network.
Optional tweaks
You can exclude some computers on your network from using the VPN interface. For example, you may prefer your gaming console to access the internet without being connected to a VPN. To do this:
1. Go to Firewall → Rules → LAN → Add.

2. Configure the settings as follows:
- Action: Pass
- Disabled: Unchecked
- Interface: LAN
- Address Family: IPv4
- Protocol: Any
- Source: Single Host or Alias and add the IP of the device you wish to exclude
- Destination: Any
- Log: Unchanged
- Description: Add a description

3. Click on Display Advanced and change Gateway to WAN.

4. Click Save and Apply Changes.
5. Go to Firewall → NAT → Outbound and switch Mode to Automatic, then click Save and Apply Change. Then switch Mode back to Manual, then click Save and Apply Change.
This creates two new rules that allow the selected device to access the local WAN network.
The device is now excluded from the VPN interface and will access the internet using the IP address assigned by your ISP. However, it will use Proton VPN’s DNS server.