How to install the Proton VPN GUI app on Debian
- Reading
- 4 mins
- Category
- Linux
Our Linux app with a graphic user interface (GUI) officially supports the latest stable Debian version running the GNOME desktop environment. It should also work with most distributions based on Debian (not Ubuntu Server or Raspbian), but these are not officially supported.
Note that we also offer the Proton VPN CLI, a command-line tool that runs from the Linux terminal.
Learn how to install and use the Proton VPN Linux CLI
To install the GUI app, open a terminal window and:
1. Download the package that contains the repository configuration and keys required to install the Proton VPN app. Enter:
wget https://repo.protonvpn.com/debian/dists/stable/main/binary-all/protonvpn-stable-release_1.0.8_all.deb
2. Install the Proton VPN repository containing the app. Enter:
sudo dpkg -i ./protonvpn-stable-release_1.0.8_all.deb && sudo apt update
Please don’t try to check the GPG signature of this release package (dpkg-sig –verify). Our internal release process is split into several parts; the release package is signed with a GPG key, and the repo is signed with another GPG key. So the keys don’t match.
If you want to check the repo package’s integrity, you can verify its checksum with the following command:
echo "0b14e71586b22e498eb20926c48c7b434b751149b1f2af9902ef1cfe6b03e180 protonvpn-stable-release_1.0.8_all.deb" | sha256sum --check -
3. Install the app. Run:
sudo apt install proton-vpn-gnome-desktop
Linux system tray icon (optional)
By default, the GNOME desktop doesn’t support tray icons. To enable this functionality on Debian-based distributions:
1. Run:
sudo apt install gnome-shell-extension-appindicator gnome-shell-extension-prefs
2. Restart your computer.
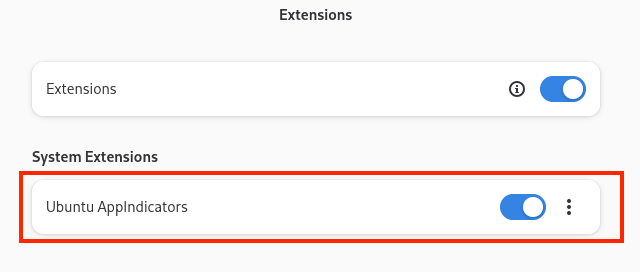
3. Open the Extensions app and ensure that System Extensions → Ubuntu AppIndicators is toggled on before launching the app.
Split tunneling (optional)
Because Debian is designed to keep dependencies to a minimum, split tunneling is not available by default. To enable it:
1. Install kernel headers for your current kernel:
sudo apt install linux-headers-$(uname -r)
2. Install systemd-resolved (more information here(new window)):
sudo apt install systemd-resolved
Restart your system. Split tunneling should be available in the app settings.
A warning about using pip and PyPI
Notes
1. How to remove the official Linux app
To uninstall the Linux app, open a terminal and enter:
sudo apt autoremove proton-vpn-gnome-desktop && sudo apt purge protonvpn-stable-release
2. How to disable the kill switch if you have uninstalled the app
You can easily turn off the kill switch inside our Linux app, but this isn’t possible if you’ve already uninstalled it. In this case, you can remove the kill switch and restore access to the internet as follows:
a) Identify the Proton VPN connection name with the command:
nmcli connection show --active
This will show a list of your system’s active connections.
b) Look for any connections that begin with prefix pvpn- This usually includes pvpn-killswitch and pvpn-ipv6leak-protection, and may include pvpn-routed-killswitch. Delete all these connections using the following command:
nmcli connection delete [connection name]
For example:
nmcli connection delete pvpn-killswitch
c) Re-run the following command to check that all Proton VPN connections have been removed:
nmcli connection show --active
If you see any Proton VPN connections left, delete them as described above.
3. Try out our beta Linux app
The beta version of our Linux app gives you access to new features before they are released publicly, but it is still in development. By using the beta version and sharing your feedback, you can help us find and address bugs.
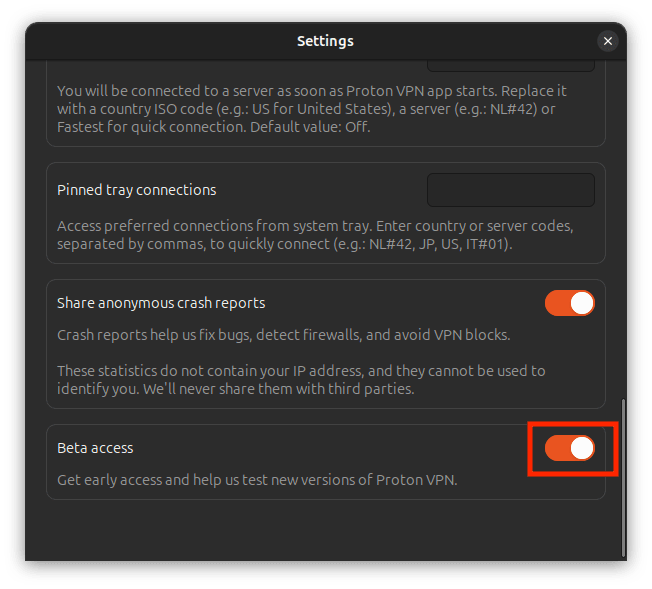
If you already have the Linux app installed, to enable beta access, simply open the app and go to Settings and toggle the Beta access switch on.
If you haven’t installed the Linux app yet, you can either install the app and then enable beta access (as above). Or you can install the beta app directly. To do this:
1. Download the beta package. Enter:
wget https://repo.protonvpn.com/debian/dists/unstable/main/binary-all/protonvpn-beta-release_1.0.8_all.deb
2. Install the Proton VPN beta repository containing the app. Run:
sudo dpkg -i ./protonvpn-beta-release_1.0.8_all.deb && sudo apt update
Please don’t try to check the GPG signature of this release package (dpkg-sig –verify). Our internal release process is split into several parts; the release package is signed with a GPG key, and the repo is signed with another GPG key. So the keys don’t match.
If you want to check the repo package’s integrity, you can verify its checksum with the following command:
echo "0f3c88b11aae384d76fc63547c4fbea1161c2aef376fb4b73d32786cbf9fa019" protonvpn-beta-release_1.0.8_all.deb | sha256sum --check -
3. Install the app. Run:
sudo apt install proton-vpn-gnome-desktop
How to remove the beta Linux app
To uninstall the beta Linux app, open a terminal and enter:
sudo apt autoremove proton-vpn-gnome-desktop && sudo apt purge protonvpn-beta-release