An SSID is the name of a wireless network. Learn about SSID meaning, how SSIDs work, how to find your SSID, and whether it’s better to broadcast or hide it.
If you set up your home WiFi network, you may have selected the network’s name (SSID) on your devices, entered the default wireless password, and connected. And that’s it — your devices have joined it automatically ever since.
Here we look at the humble SSID and explain why you should review yours and related wireless settings to secure your network.
- What is an SSID?
- What does SSID stand for?
- Where do I find my SSID?
- How to find your SSID on Windows 10
- How to find your SSID on Windows 11
- How to find your SSID on macOS
- How to find your SSID on Linux using the command line
- How to find your SSID on Linux using NetworkManger
- How to find your SSID on Android
- How to find your SSID on iOS and iPadOS
- How to find your SSID on Chrome OS (Chromebook)
- Why change your default SSID?
- How to change your SSID and WiFi password
- When to use multiple SSIDs
- Should you broadcast your SSID?
- Boost your network security
- Sharing your WiFi and VPN connection
What is an SSID?
An SSID, also known as a network ID, is the name given to a wireless local area network (WLAN)(nové okno), like your home WiFi. Wireless routers or access points broadcast SSIDs so that devices can find local WiFi networks.
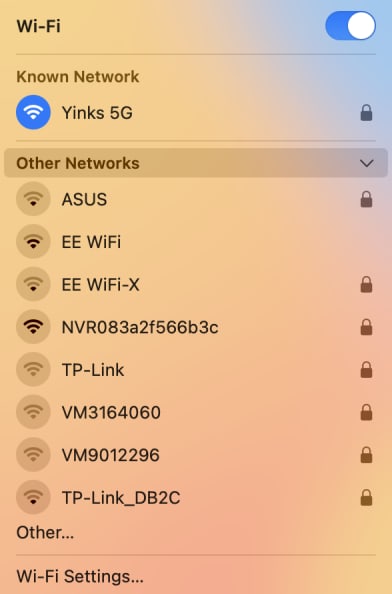
When you look for a WiFi network on your laptop or smartphone, you see a list of SSIDs — the names of the wireless networks available in your area. A lock indicates you’ll need a password to connect to it.
What does SSID mean?
SSID stands for Service Set IDentifier — the name that identifies a service set. So what’s a “service set”?
A “basic service set” is the smallest building block of an IEEE 802.11 standard(nové okno) wireless network, better known by the brand name Wi-Fi. In simple terms, a basic service set is a group of devices linked to one access point, forming a wireless network.
When data is transmitted on a wireless network, every data packet carries an SSID to identify which service set or network it belongs to. All devices must use this SSID to communicate on the network.
How to find your SSID?
To connect a device to a WiFi network for the first time, you’ll need to know the network’s SSID. If you’re setting up your home WiFi router, you can usually find a label with “SSID” or “Network Name” and a default WiFi password on the bottom or side of your router.
If your device is already connected to a wireless network, you can find the SSID of the network you’re using as follows:
How to find your SSID on Windows 10
1. Go to your System Tray → WiFi icon (by default, this is at the bottom right of your screen).
2. A list of available networks (SSIDs) will appear. Your SSID is at the top, with the message Connected, secured.
How to find your SSID on Windows 11
Go to your System Tray → WiFi icon (by default, this is at the bottom right of your screen). You’ll be able to see the SSID your computer is connected to in the Quick Settings menu.
To see a list of all available WiFi networks, click > next to WiFi button.
How to find your SSID on macOS
Go to the menu bar → WiFi icon → Known networks (or Preferred Network on older versions of macOS). Your current SSID is designated by a colored WiFi icon.
How to find your SSID on Linux using the command line
Open a terminal window and enter iwgetid.
How to find your SSID on Linux using NetworkManger
If you prefer to use a GUI and your desktop environment supports NetworkManager, click the WiFi icon in your notification panel to see a list of available WiFi networks. The SSID of the network you’re connected to is listed at the top.
(Note: details may vary a little, depending on the desktop environment you use.)
How to find your SSID on Android
Go to Settings → Connections → Wi-Fi. Your SSID name will be listed under Current network.
(Details may vary a little, depending on which version of Android you’re running.)
How to find your SSID on iOS and iPadOS
Go to Settings → Wi-Fi.
Your SSID will appear at the top with a checkmark next to it.
How to find your SSID on Chrome OS (Chromebook)
Go to your system Tray → WiFi icon. You’ll be able to see the SSID your computer is connected to in the notification menu.
To see a list of all available WiFi networks, click WiFi button in the notification menu.
Why change your default SSID?
Out of the box, wireless routers and access points have a default SSID. This might be its manufacturer’s name, like Linksys or Netgear, or your internet service provider (ISP) if your router came with your broadband package.
There are several reasons it’s a good idea to change your router’s default SSID:
- To give your network a unique name you can remember and avoid confusion with your neighbors’ networks, which may use a similar default name.
- To deter hackers by showing that the home network is actively managed, not left on less secure default settings.
- To create different SSIDs for different purposes, like one for guests (see below).
Technically, your SSID doesn’t have to be unique, but it’s important to make it different from others in your area. If your neighbor had the SSID “My_Home_WiFi” and you made yours the same, your devices might try to connect to the wrong network at times, depending on the strength of your home WiFi signal.
How to change your SSID and WiFi password
To change your default SSID and password, you need to log in to your router as an administrator (admin).
You can usually do this in a web browser through a specific address, like 192.168.1.1 (check your router’s documentation for your address). Or your router may come with a mobile app that allows you to adjust your wireless settings.
How to change your SSID
1. Enter your router’s IP address in your browser or open its mobile app.
2. Log in using the admin username and password. If you’ve never changed these credentials, you can usually find them on a label on the router’s case, together with the SSID.
3. Open the Wireless or WiFi settings menu and a new name in the Network name or SSID name field.
SSIDs can be up to 32 letters, numbers, or special characters (spaces, periods, underscores, etc.). They’re also case-sensitive, so Network-Name-Example is different from network-name-example.
Ensure the name is easy to remember, but don’t include personal details, like your name and address.
4. Click Apply or Save when you’re done.
The SSID is just the name of your WiFi network and therefore has little impact on security. However, while you’re on your router’s admin page or app, it’s a =good idea to review your WiFi password settings to ensure your network is secure.
- Check your password encryption protocol Security. If your router supports the latest WiFi security standard for keeping your WiFi connections secure, choose WPA3 (most secure) or WPA3/WPA2 hybrid mode (much less secure, but will work with most devices). Avoid WEP, which can be easily cracked. If your router only offers WEP, you should upgrade its firmware or consider getting a new one.
Learn more about WPA3 and WiFi security standards
- Change your WiFi password from the default password set by your router’s manufacturer. Use a strong password(nové okno) or passphrase.
- Disable WiFi Protected Setup (WPS). Designed to make it easier to connect new devices, WPS is a security risk(nové okno).
- Change your router’s default admin username and password, adding a strong password if it doesn’t have one. Look for Change password or a similar setting in the admin account. Otherwise, anyone who sees these login details on the case of your router could gain administrator access. In addition to this, the default admin passwords for popular routers are widely available on hacker sites.
When to use multiple SSIDs
Using more than one SSID allows you to create separate password-protected networks for different purposes. That way you can protect your primary WiFi password and restrict access to your network.
For example, you might see one SSID for students and another for staff if you’re at school. Or if you’re running a small business, you might want to set up one SSID for your employees and a guest SSID for visitors.
Guest SSIDs
Likewise, at home, you can enable a guest SSID with a separate password with most routers.
For example, My-WiFi-Name could be your main SSID with full local network access, including file sharing and printing, while My-WiFi-Name-Guest for visitors could provide internet access only.
Guest SSIDs are usually switched off by default. Log in to your router as an admin (see how above) and look for a switch to enable the guest access point in the Wireless settings. Like your main SSID, you can change the guest SSID name and password.
Learn more about guest networks
Dual-band SSIDs
Another reason to have more than one SSID is to differentiate frequency bands for your wireless network.
Since the introduction of the 802.11n wireless standard in 2009, also known as WiFi 4, many wireless routers have been able to broadcast on two bands simultaneously: 2.4 GHz and 5 GHz. Most routers now use at least 802.11ac (WiFi 5), although routers with the latest 802.11ax (WiFi 6 and WiFi 6E) are becoming increasingly popular.
MAIN WIFI STANDARDS
WiFi standard | Year released | Frequency bands | Max speed |
---|---|---|---|
802.11b (WiFi 1) | 1999 | 2.4 GHz | 11 Mbps |
802.11a (WiFi 2) | 1999 | 5 GHz | 54 Mbps |
802.11g (WiFi 3) | 2003 | 2.4 GHz | 54 Mbps |
802.11n (WiFi 4) | 2009 | 2.4 GHz, 5 GHz | 600 Mbps |
802.11ac (WiFi 5) | 2013 | 5 GHz (optional 2.4 GHz via 802.11n) | 3.4 Gbps |
802.11ax (WiFi 6) | 2019 | 2.4 GHz, 5 GHz | 9.6 Gbps |
802.11ax (WiFi 6E) | 2021 | 6 GHz | 9.6 Gbps |
802.11be (WiFi 7) | (2024) | 2.4 GHz, 5 GHz, 6 GHz | 46 Gbps |
While the 5 GHz and 6Ghz bands support faster speeds and are less congested than the 2.4 GHz one, the lower frequency of 2.4 GHz can better penetrate solid objects, offering a better range. So if you have a dual-band router, which should you choose?
By default, most modern routers will choose for you. They broadcast both bands with the same SSID and use band steering(nové okno) to push devices to connect to the best network. That means older devices connect to the 2.4 GHz network, while newer, 5 GHz or 6 GHz-enabled ones should automatically join the faster bands if the signal is strong enough.
However, if you want to be able to choose which band to connect to manually, you can split the two bands into separate SSIDs, for example, named as follows:
- My-WiFi-Name — 2.4 GHz band for older devices and a longer service range.
- My-WiFi-Name-5G — 5 GHz band for newer devices and a shorter service range.
Change your SSIDs in your router’s wireless settings, as outlined above (check your router’s documentation for details).
Should you broadcast your SSID?
You can turn off (disable) the broadcast of your SSID so it’s not publicly visible. Then it won’t appear on lists of available WiFi networks on devices in the area. But contrary to popular opinion, that won’t significantly enhance your network security.
First, even when you disable SSID broadcast, your SSID is still included in each data packet on your network. A hacker can easily “sniff” it out using wireless packet-sniffing software.
Second, turning off SSID broadcast could actually attract local hackers to your network. If you’re lying low, they might think you’ve got something to hide.
In short, there’s little point in trying to hide your SSID. And with SSID broadcast disabled, you’ll just make it more difficult to connect a new device — you’ll have to manually enter your SSID every time.
Boost your network security
Following the advice above on SSIDs, encryption, and passwords will help you secure your wireless network. It’s also important to keep your router’s firmware updated.
If you’re tech-savvy and want to further boost your network security, you can set up a VPN on your router. A VPN on your router will automatically encrypt all your traffic, securing your whole network, even for devices that don’t support a VPN.
At Proton, our mission is to make internet privacy and security available to all. That’s why we offer a free Proton VPN service, which you could try installing on your router. If you’d like to support, please consider upgrading to Proton VPN Plus for more features.
Sharing your WiFi and VPN connection
Most operating systems allow you to create a WiFi hotspot that others can connect to so they can share your internet connection. When you create this hotspot, you’ll also need to give it a name (SSID).
On many operating systems, you can also share your VPN connection over this shared WiFi connection so that any devices using your device as a WiFi hotspot also benefit from VPN protection.