Comment configurer manuellement WireGuard sur Linux
- Lecture
- 4 minutes
- Catégorie
- Linux
WireGuard® est un protocole VPN rapide, léger et sécurisé.
Vous pouvez configurer manuellement WireGuard sur Linux à l’aide de clients tiers. Dans cet article, nous allons vous montrer comment procéder à l’aide de :
Cependant, nous vous recommandons vivement d’utiliser notre application GUI Linux officielle ou notre CLI Linux. Elles constituent le moyen le plus simple de vous connecter à nos serveurs et vous permettent de bénéficier de nombreuses fonctionnalités avancées.
Sur notre application GUI Linux, vous pouvez choisir entre les protocoles VPN OpenVPN et WireGuard. Notre CLI Linux utilise toujours WireGuard.
Avant de commencer
Avant de commencer, vous devrez télécharger un fichier de configuration WireGuard Proton VPN.
- Connectez-vous à account.protonvpn.com, accédez à Téléchargements → Configuration WireGuard, et téléchargez un fichier de configuration WireGuard.
- WireGuard peut se montrer exigeant quant à la longueur des noms .conf, veuillez donc vous assurer que le nom du fichier .conf téléchargé contient moins de 15 caractères. Vous devrez peut-être modifier le nom suggéré par défaut pour y parvenir.
- Toutes nos configurations WireGuard actuelles prennent en charge les connexions IPv6. Si vous utilisez un fichier de configuration plus ancien, veuillez en télécharger un nouveau.
Découvrez comment télécharger un fichier de configuration WireGuard depuis Proton VPN
NetworkManager
NetworkManager est installé par défaut sur la plupart des distributions Linux et environnements de bureau, et constitue un moyen plus pratique de gérer vos connexions WireGuard que wg-quick.
Il existe deux façons d’utiliser NetworkManager avec WireGuard :
Utiliser une interface graphique
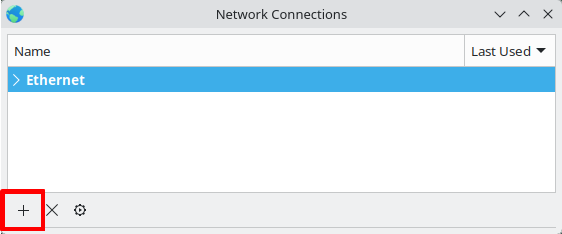
1. Ouvrez un terminal et exécutez nm-connection-editor. Si la commande n’existe pas, installez le paquet nm-connection-editor à l’aide du gestionnaire de paquets de votre système, puis réessayez.
2. Cliquez sur le bouton plus (+).
3. Sélectionnez Importer une configuration VPN enregistrée dans le menu déroulant et cliquez sur Créer…
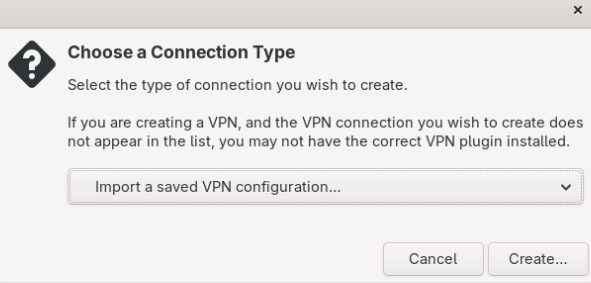
4. Localisez le fichier .conf de WireGuard que vous avez téléchargé et cliquez sur Ouvrir.
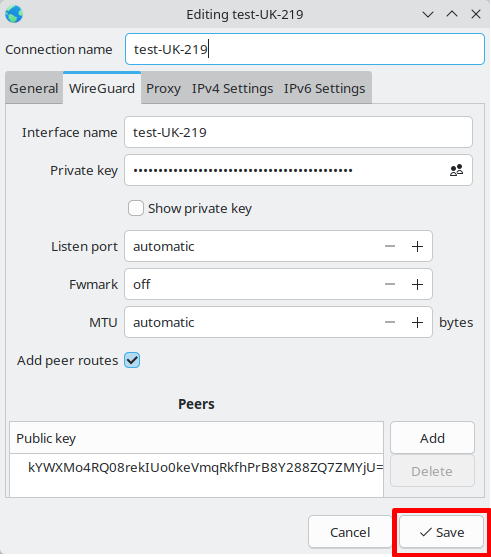
5. Cliquez sur Enregistrer.
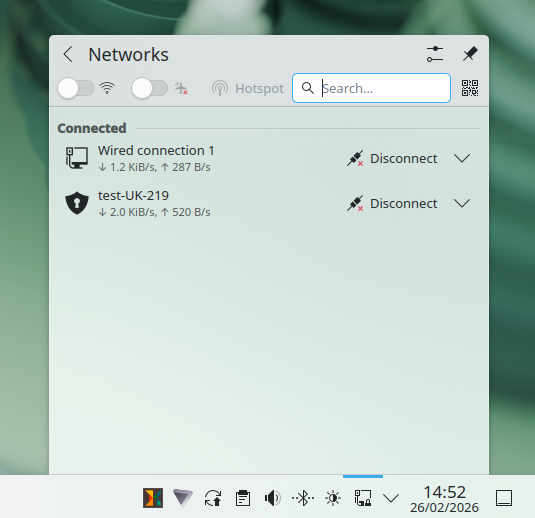
Vous pouvez désormais gérer votre connexion WireGuard directement depuis l’interface graphique de NetworkManager intégrée à votre environnement de bureau.
Pour modifier votre connexion à l’avenir, exécutez nm-connection-editor et cliquez sur le bouton Modifier.

Si vous utilisez un environnement de bureau qui ne propose pas d’interface graphique pour NetworkManager, vous pouvez utiliser l’application GUI de la zone de notification nm-applet pour gérer facilement vos connexions. Vous pouvez également utiliser NetworkManager via la ligne de commande. Toutes les configurations WireGuard que vous avez importées via nm-connection-editor seront disponibles dans le terminal, et inversement.
À l’aide de la CLI
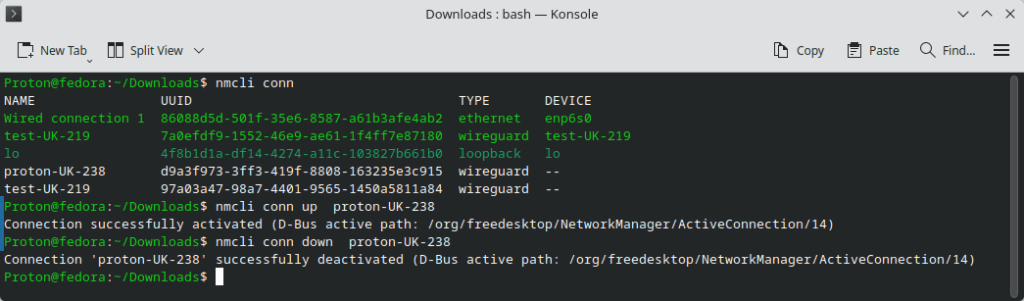
Ouvrez un terminal et exécutez :
nmcli conn import type wireguard file [nom_du_fichier]
Le nom du fichier doit correspondre au fichier .conf WireGuard que vous avez téléchargé. Par exemple :
nmcli conn import type wireguard file proton-238.conf
L’exécution de cette commande vous connecte automatiquement au serveur Proton VPN. Pour vous connecter à nouveau, exécutez :
nmcli conn up [connexion]
Par exemple :
nmcli conn up proton-UK-238
Pour vous déconnecter, exécutez :
nmcli conn down [connexion]
Par exemple :
nmcli conn down test-UK-238
Vous pouvez lister les connexions disponibles à l’aide de la commande nmcli conn.
wg-quick
wg-quick est l’outil CLI officiel de WireGuard VPN pour Linux. Il est particulièrement utile si vous utilisez une distribution Linux minimale sur laquelle NetworkManager n’est pas installé.
1. Installez(nouvelle fenêtre) wg-quick(nouvelle fenêtre) pour votre distribution.
2. Déplacez le fichier de configuration que vous avez téléchargé dans le répertoire /etc/wireguard/.
3. Dans une fenêtre de terminal, saisissez :
sudo wg-quick up [le nom du fichier de configuration, sans le suffixe .conf]
Par exemple, si votre fichier de configuration est nommé swiss1-CH-5.conf, saisissez :
sudo wg-quick up swiss1-CH-5

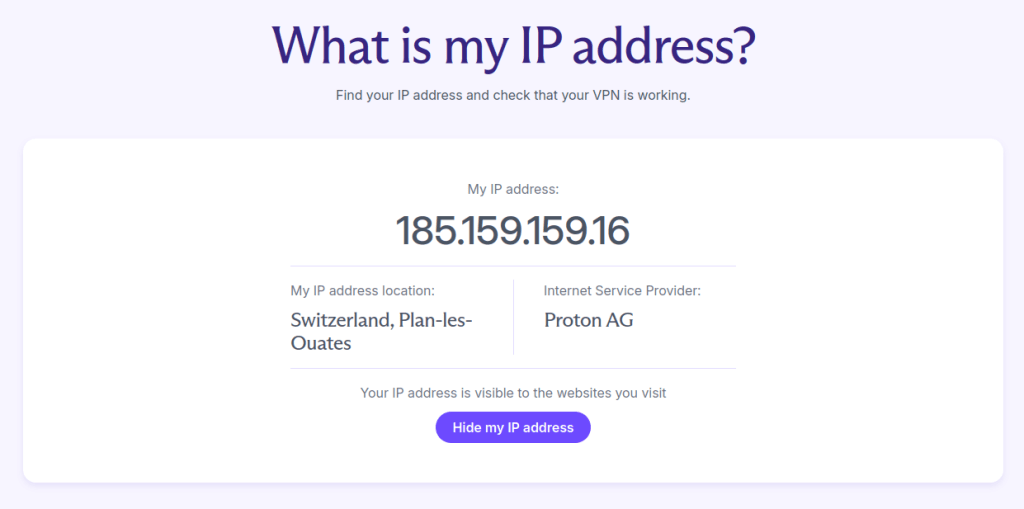
Votre vie privée est désormais protégée par Proton VPN ! Pour vérifier que la connexion est active, saisissez :
sudo wg
Vous pouvez également consulter notre scanner d’IP gratuit et sécurisé pour confirmer que tout fonctionne correctement.
Pour mettre fin à la session VPN, saisissez :
sudo wg-quick down [le nom du fichier de configuration, sans le suffixe .conf]
Par exemple :
sudo wg-quick down swiss1-CH-5