Jak používat aplikaci Proton VPN pro Windows
- Čtení
- 10 minut
- Kategorie
- Aplikace Proton VPN
The Proton VPN Windows app supports Windows 10 64-bit (19045) and later.
V tomto článku se podíváme na to, jak nainstalovat a používat aplikaci Proton VPN pro Windows. Konkrétně se zaměříme na:
Jak nainstalovat Proton VPN pro Windows
- Přihlaste se k Proton VPN
- Připojte se k nejrychlejší zemi povolené vaším plánem
- Změňte server (pokud máte Free plan)
- Připojte se ke konkrétnímu umístění nebo speciálnímu serveru (pokud máte placený plán Proton VPN)
- Nedávná a připnutá připojení
- Profily
Jak se odpojit od serveru Proton VPN
- Z okna aplikace
- Ze systémové lišty
- Váš účet Proton VPN
- Připojení
- Obecné
- Podpora
- Pomozte zlepšit Proton
Jak nainstalovat Proton VPN pro Windows
Ve výchozím nastavení vám systémy Windows 10 a 11 umožňují instalovat aplikace pouze z obchodu Microsoft Store. Chcete-li nainstalovat aplikaci Proton VPN, budete muset povolit instalaci aplikací z jiných zdrojů. Chcete-li to provést (pokud jste tak již neučinili), otevřete v systému Windows Nastavení → Aplikace a funkce → Zvolit, odkud se mají získávat aplikace a z rozbalovací nabídky vyberte možnost Kdekoli.
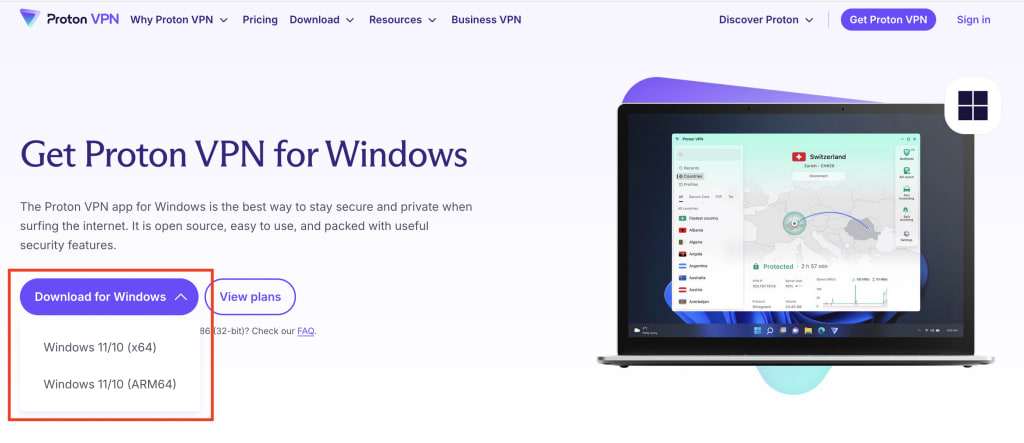
1. Navštivte naši stránku Proton VPN pro Windows, klikněte na tlačítko Stáhnout pro Windows a vyberte verzi systému Windows 11 nebo 10, kterou používáte (x64 nebo ARM64). V případě pochybností – většina lidí používá systémy x86.
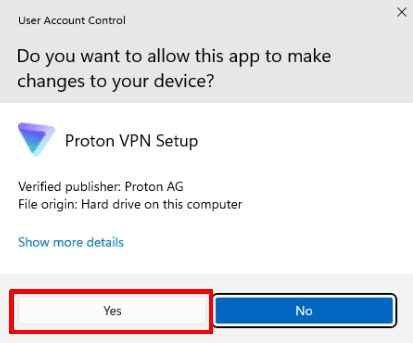
2. Po stažení souboru EXE na něj dvakrát klikněte, abyste jej otevřeli, a po zobrazení dotazu, zda chcete aplikaci povolit provádění změn ve vašem zařízení, klikněte na Ano.
3. Tím se otevře průvodce instalací Proton VPN. Z rozbalovací nabídky vyberte jazyk, který chcete používat, a klikněte na OK.

4. Kliknutím na Další použijete pro Proton VPN výchozí složku v nabídce Start systému Windows. Pokud chcete použít jinou složku, klikněte na Procházet a vyhledejte místo, kde se má Proton VPN v nabídce Start zobrazovat. Až budete hotovi, klikněte na Další.

5. Můžete automaticky nainstalovat další aplikace Proton zahrnuté ve vašem plánu. Zrušte označení těch, které si nepřejete instalovat, a poté pokračujte kliknutím na Instalovat.
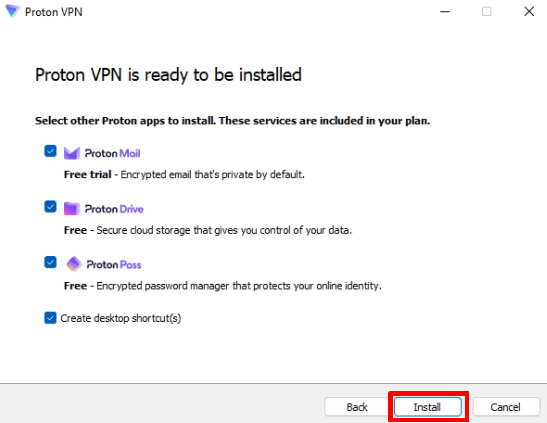
6. Zkontrolujte své volby a pokračujte výběrem možnosti Instalovat.

7. Počkejte, než se aplikace nainstaluje do vašeho systému.

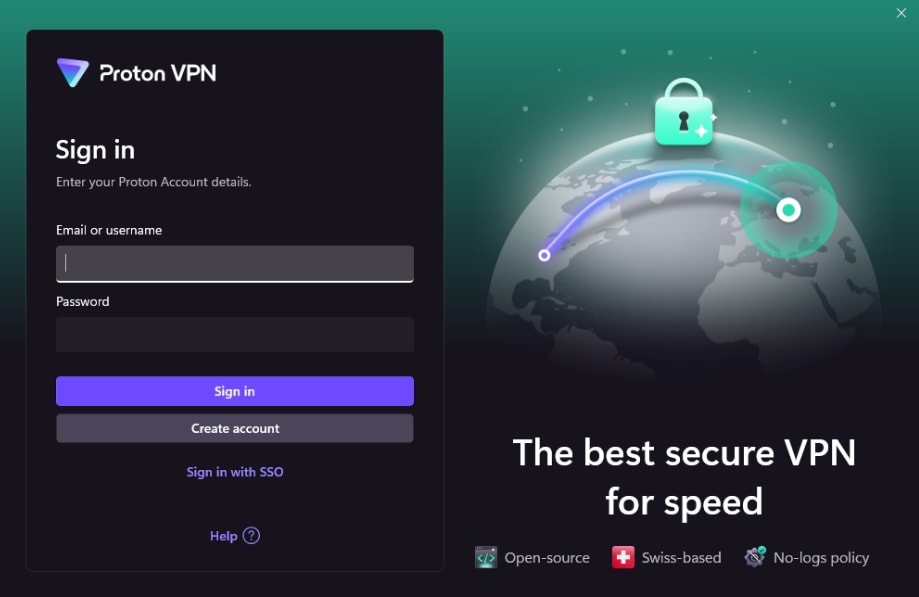
8. Jakmile je aplikace nainstalována, průvodce instalací se zavře a spustí se aplikace Proton VPN. Nyní se můžete přihlásit ke svému účtu Proton.
Jak se připojit k Proton VPN
Přihlaste se k Proton VPN
Otevřete Proton VPN z hlavního panelu nebo pomocí ikony na ploše. Přihlaste se pomocí uživatelského jména a hesla, které jste si vytvořili při registraci, a klikněte na Přihlásit se.
Pokud ještě nemáte vytvořený účet Proton VPN, můžete použít tlačítko Vytvořit účet nebo kliknout sem. Upozorňujeme, že pokud jste se již zaregistrovali k jakékoli službě Proton (například Proton Mail, Proton Drive nebo Proton Pass), můžete k přihlášení do Proton VPN použít stejné uživatelské jméno a heslo.
Pokud má vaše organizace nastavené jednotné přihlášení (SSO), klikněte místo toho na Přihlásit se pomocí SSO.
Připojte se k nejrychlejší zemi povolené vaším plánem
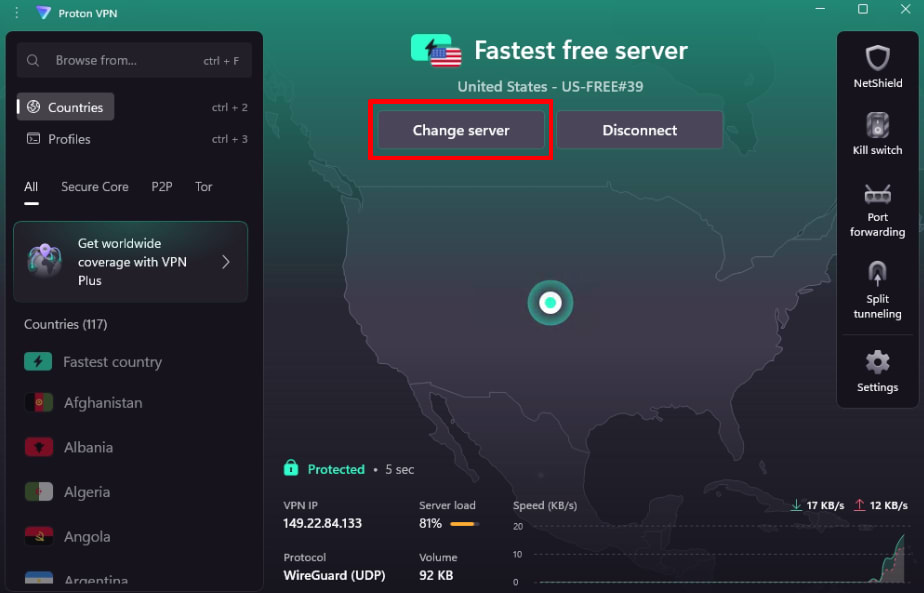
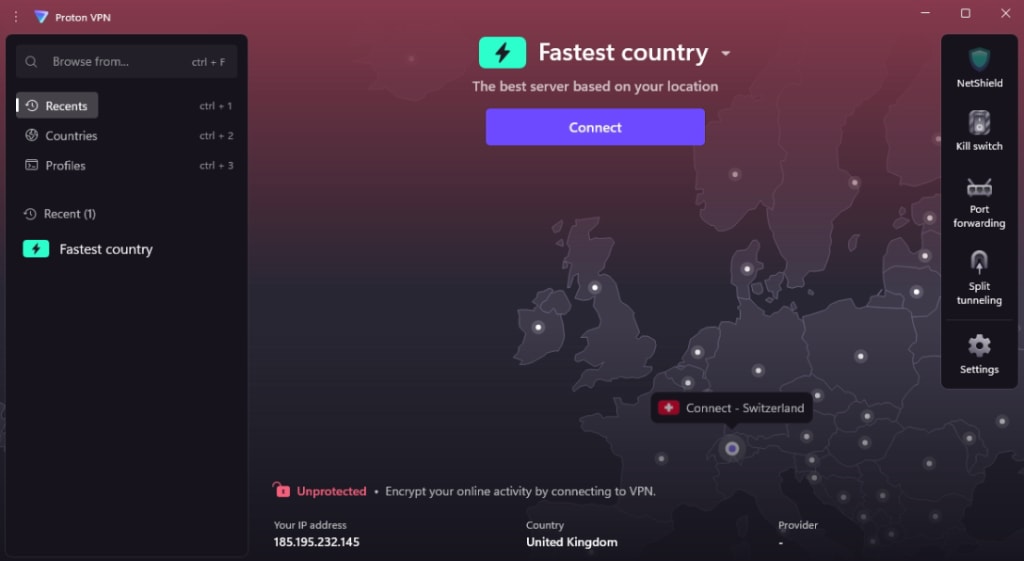
Pokud využíváte náš Free plan, vyberte možnost Připojit pro automatické připojení k nejrychlejšímu bezplatnému serveru ve vaší lokalitě.
Pokud máte placený plán, vyberte možnost Připojit pro automatické připojení k nejrychlejšímu serveru ve vaší lokalitě. Servery Plus máme ve více než 140 zemích po celém světě (můžete také vybrat možnost Nejrychlejší země na záložce Země – viz níže). Upozorňujeme, že své výchozí připojení můžete změnit (co se stane, když kliknete na Připojit).

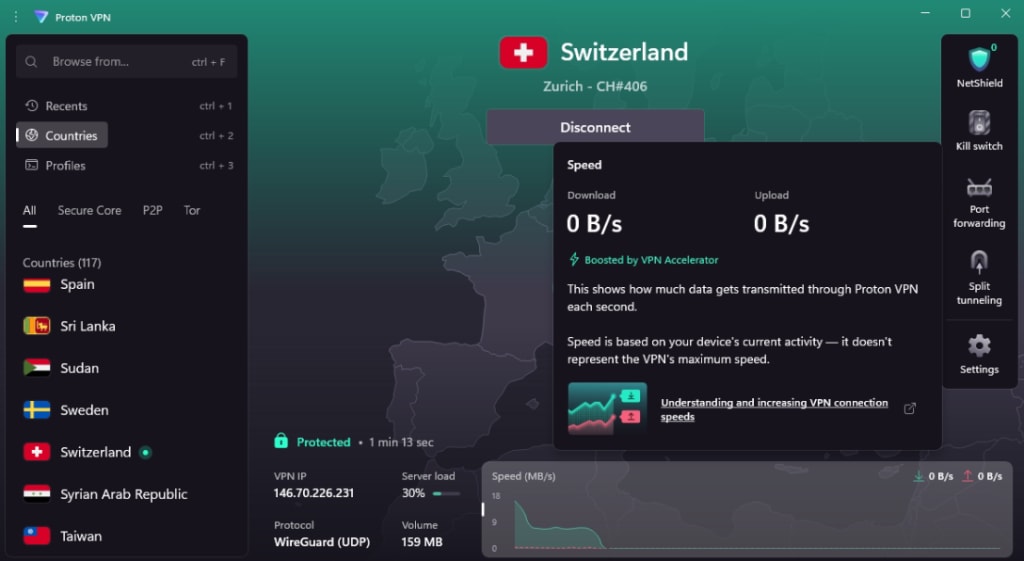
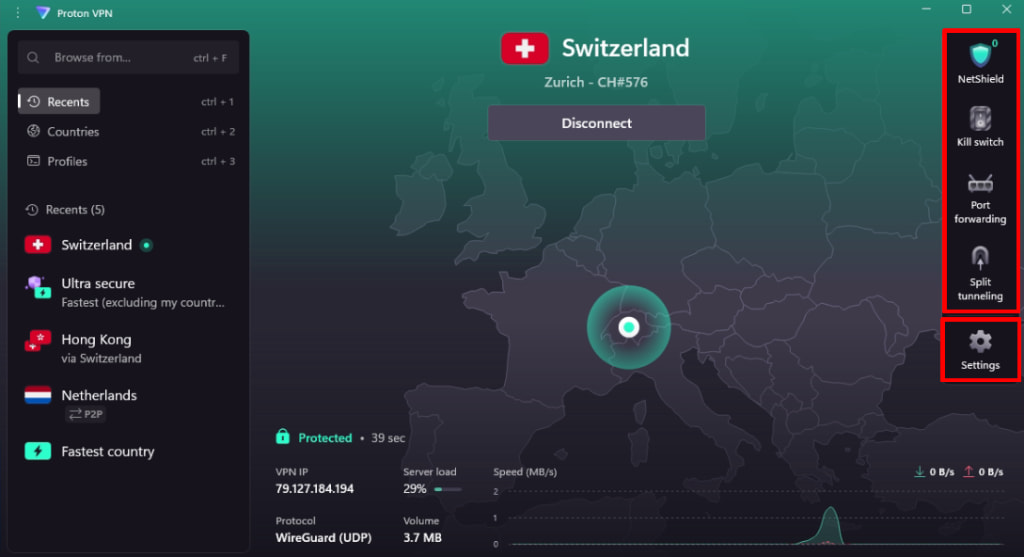
Po připojení se obrazovka Domů zbarví zeleně a na mapě se zobrazí poloha serveru, ke kterému jste připojeni, spolu s informacemi o vašem připojení (jako je IP adresa serveru, vytížení serveru, rychlost připojení, protokol VPN a množství dat přenesených přes připojení VPN).
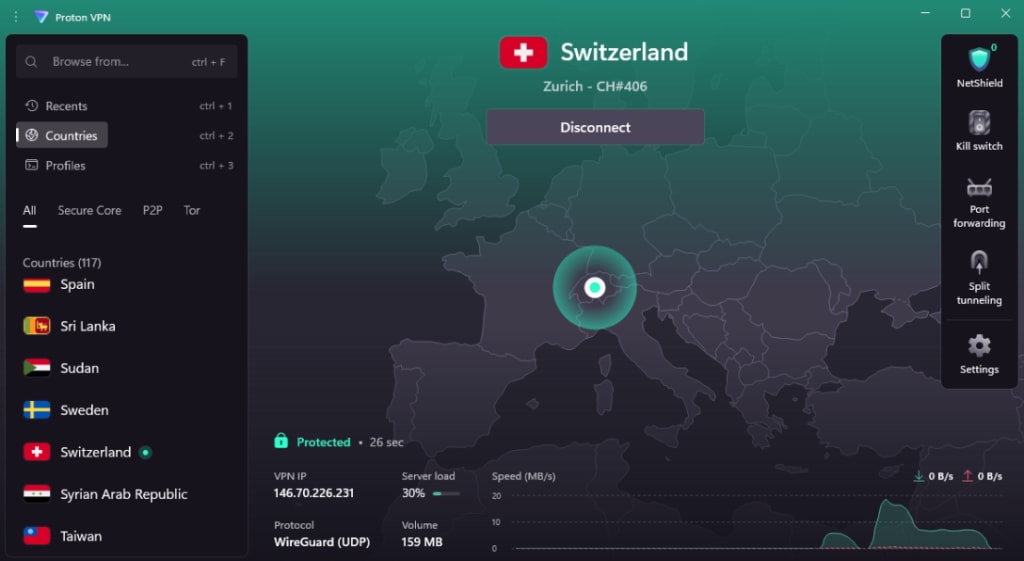
Kliknutím na kterýkoli z těchto informačních prvků zobrazíte další podrobnosti a vysvětlení.
Změnit server (pokud využíváte Free plan)
Po připojení k náhodnému bezplatnému serveru jej můžete po krátké době čekání změnit na server v jiné náhodné zemi (Nizozemsko, Japonsko, Rumunsko, Polsko, Norsko, Švýcarsko, Singapur, Mexiko, Kanada a Spojené státy). Chcete-li to provést, jednoduše zvolte možnost Změnit server na obrazovce Domů.
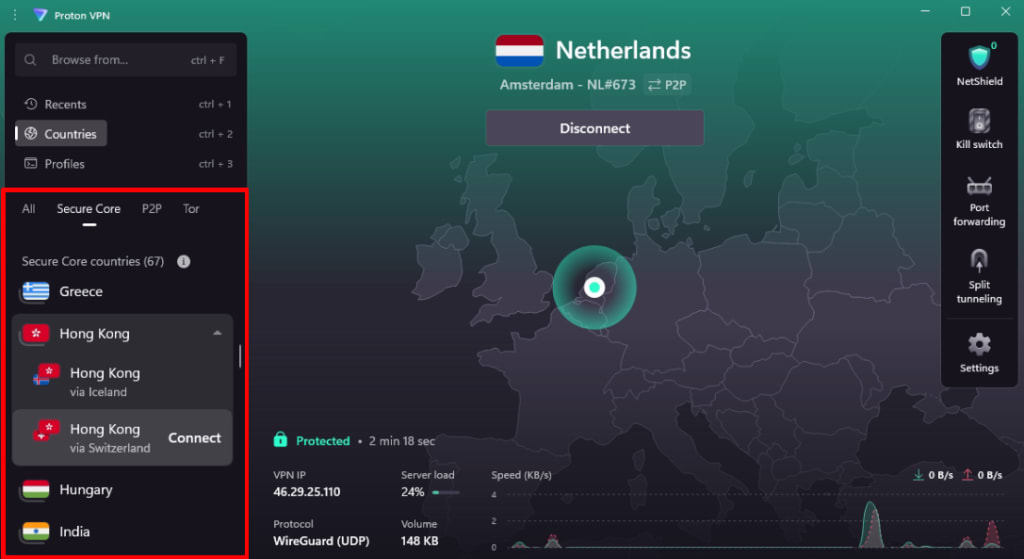
Připojení ke konkrétnímu umístění nebo speciálnímu serveru (pokud máte placený plán Proton VPN)
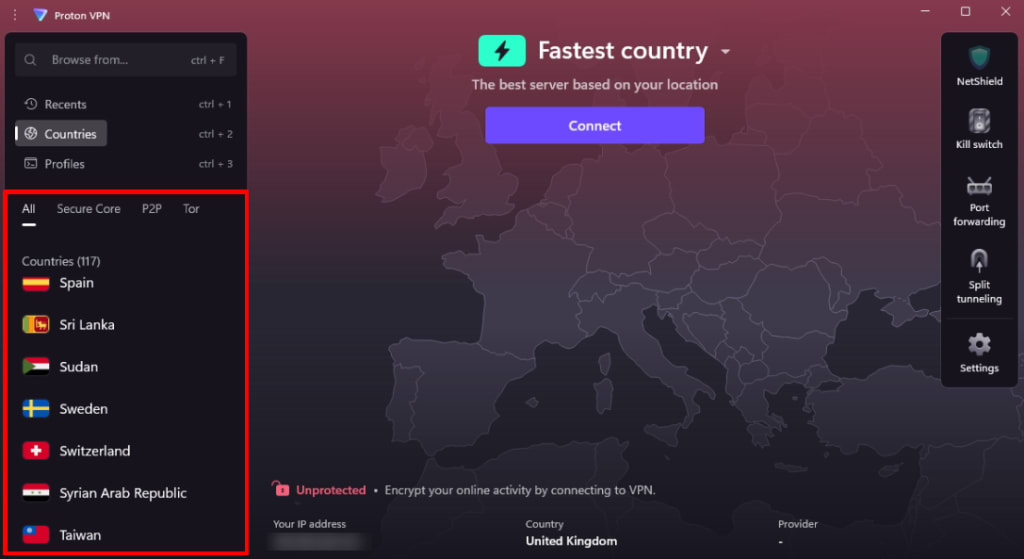
Pokud máte jakýkoli placený plán Proton VPN, můžete se připojit k libovolnému z našich vysokorychlostních serverů ve více než 140 zemích. Chcete-li se připojit k nejrychlejšímu serveru ve vámi zvolené zemi, jednoduše jej vyberte ze seznamu Země → Vše. Automaticky vás připojíme k nejrychlejšímu serveru v dané zemi (s přihlédnutím k vaší poloze a vytížení serverů).
Chcete-li se připojit ke konkrétnímu městu v zemi, klikněte na ⏷ vedle dané země a vyberte město z rozbalovacího seznamu. Chcete-li se připojit ke konkrétnímu serveru ve městě, klikněte na ⏷ vedle města a vyberte server z rozbalovacího seznamu.
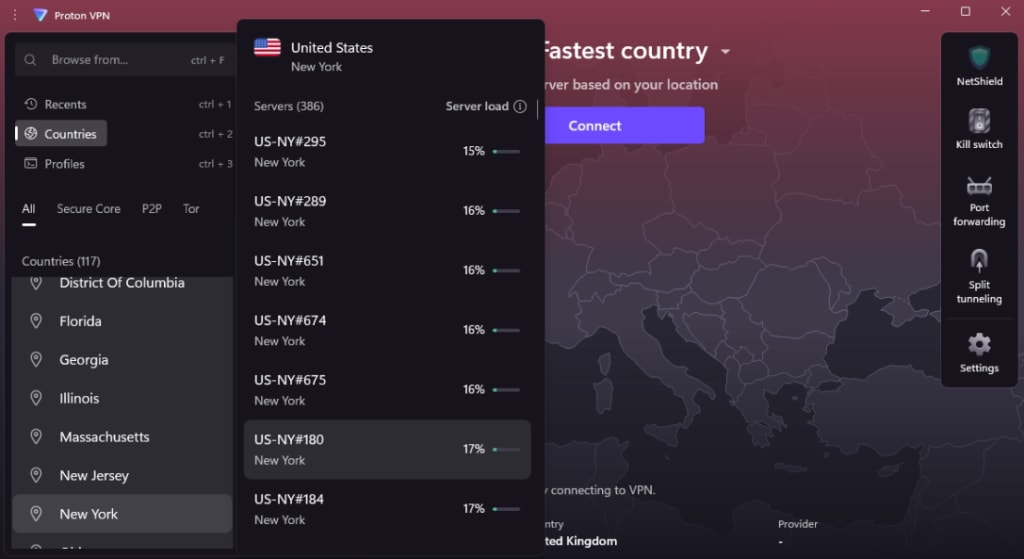
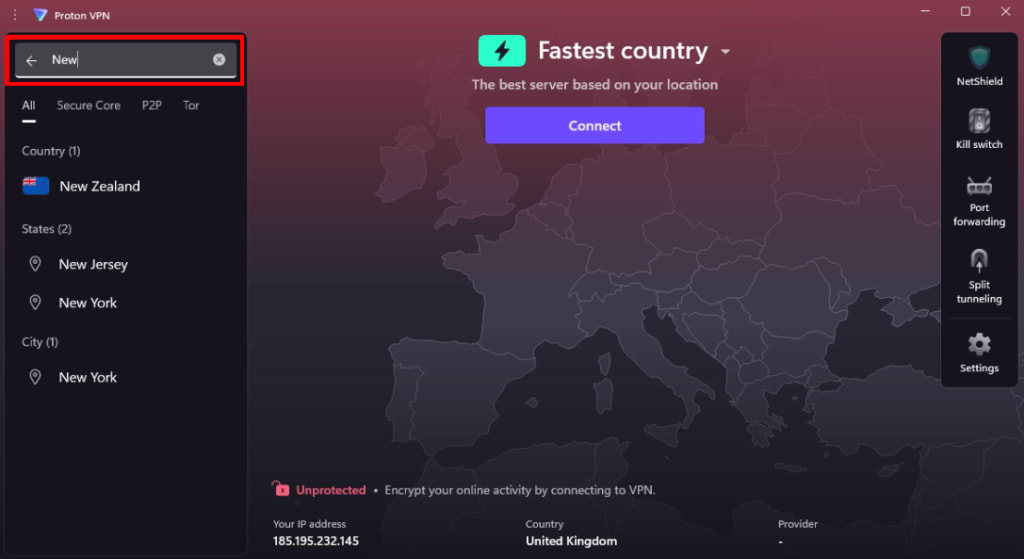
Jakoukoli zemi, město nebo server můžete vyhledat zadáním jejich názvu do pole Hledat.
Zemi můžete vybrat také pomocí mapy.
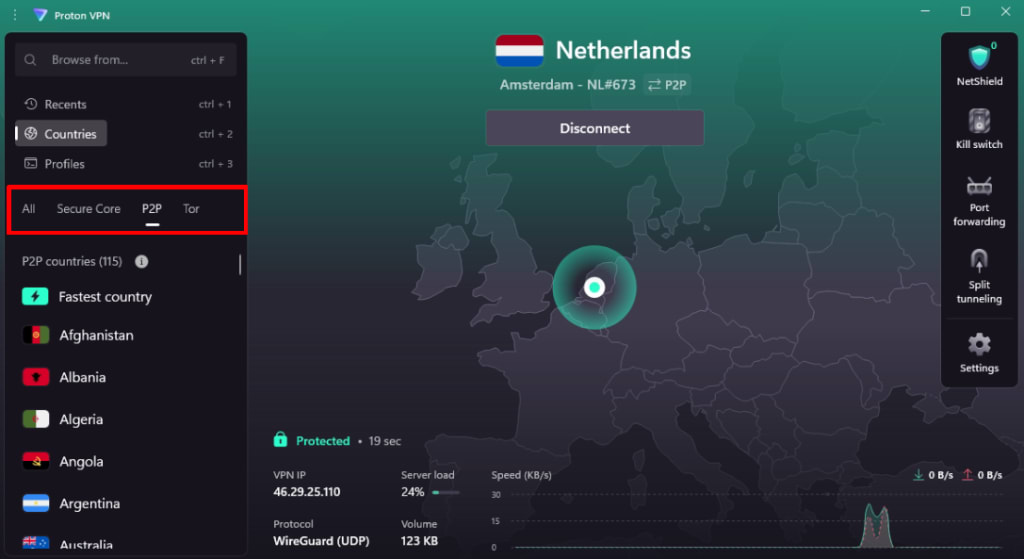
Některé servery Proton VPN mají speciální využití. Jsou to:
- Secure Core: Naše mimořádně bezpečné řešení se dvěma VPN
- P2P: Naše vyhrazené servery pro P2P a torrenty
- Tor: Připojte se k síti Tor přes Proton VPN bez nutnosti použít prohlížeč Tor
Vyberte příslušnou záložku filtru, abyste zobrazili seznam zemí a serverů, které tuto funkci podporují.
Pokud jednoduše vyberete zemi se Secure Core, vaše připojení bude automaticky směrováno přes nejlepší umístění serveru Secure Core (Island, Švédsko nebo Švýcarsko) pro vámi zvolenou zemi. Pokud chcete, klikněte na ⏷ vedle země a vyberte umístění serveru Secure Core z rozbalovacího seznamu. (Upozorňujeme, že ne všechny země se Secure Core podporují všechna umístění serverů Secure Core.)
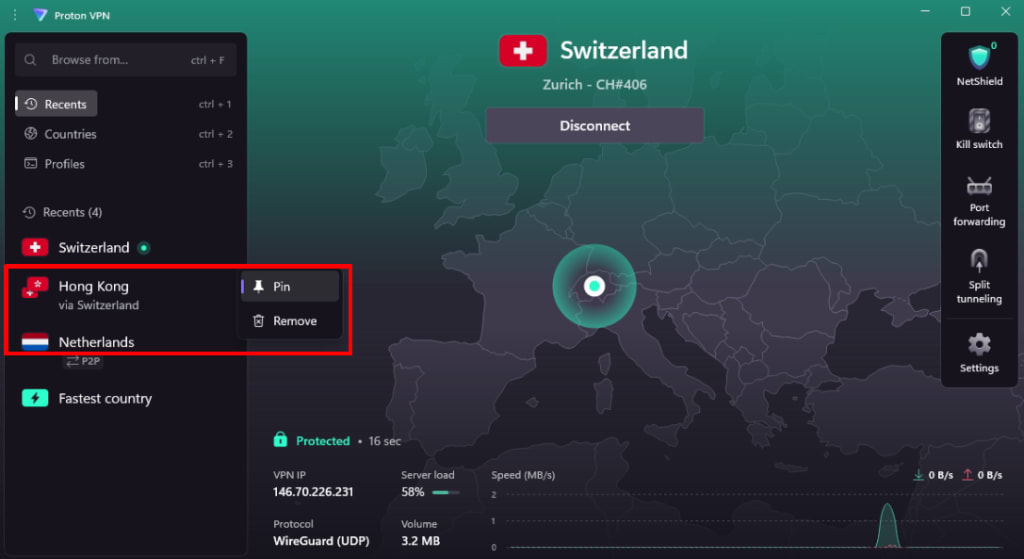
Nedávná a připnutá připojení
Na levé straně domovské obrazovky vidíte seznam zemí, měst, serverů a profilů (viz níže), ke kterým jste se nedávno připojili. Jednoduše na některou z těchto položek klikněte a připojte se stejným způsobem jako předtím.
Pokud se pravidelně připojujete určitým způsobem, můžete si jakékoli připojení připnout do seznamu Nedávné pro snadný přístup. Chcete-li to provést, klikněte na ⋮ vedle země, města, serveru nebo profilu → Připnout.
Profily
Chcete-li mít nad často používanými připojeními ještě větší kontrolu, můžete si vytvořit profil připojení VPN. Vyberte seznam Profily, kde uvidíte již vytvořené profily, nebo klikněte na +Nový profil a vytvořte nový.
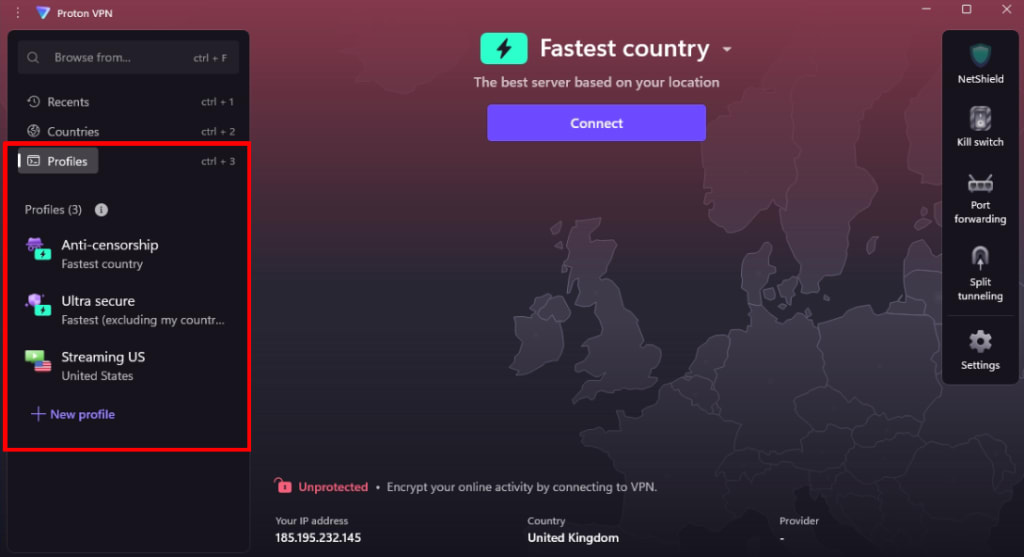
Více informací o vytváření a používání profilů připojení VPN
Posláním Proton VPN je učinit soukromí výchozím nastavením pro každého a pro ty, kteří nás nejvíce potřebují, budeme vždy nabízet 100% bezplatné služby. Chcete-li však získat přístup k mnoha našim volitelným pokročilým funkcím, budete potřebovat placený tarif Proton VPN. Funkce, nastavení a servery, které vyžadují placený tarif Proton VPN, jsou jasně označeny odznakem Proton+. Chcete-li tyto funkce využívat a podpořit naše poslání, zvažte prosím přechod na placený tarif Proton VPN.
Jak se odpojit od serveru Proton VPN
Jakmile jste připojeni k serveru Proton VPN, odpojení je rychlé a lze jej provést několika způsoby v závislosti na tom, jak s aplikací raději pracujete.
Z okna aplikace
Otevřete aplikaci Proton VPN a na domovské obrazovce uvidíte svůj aktuální stav připojení spolu se serverem, ke kterému jste připojeni. Klikněte na tlačítko Odpojit, které se výrazně zobrazuje v panelu připojení. Ukazatel stavu se změní z Připojeno na Nepřipojeno a vaše IP adresa se vrátí na vaši skutečnou adresu.

Ze systémové lišty
Pokud nechcete otevírat celou aplikaci, můžete se odpojit přímo ze systémové lišty Windows:
- V pravém dolním rohu hlavního panelu klikněte na šipku ^, abyste zobrazili skryté ikony.
- Klikněte na ikonu Proton VPN.
- Vyberte možnost Odpojit.

Ikona se aktualizuje, aby odrážela, že již nejste připojeni.
*Po odpojení již nebude váš internetový provoz směrován přes Proton VPN.
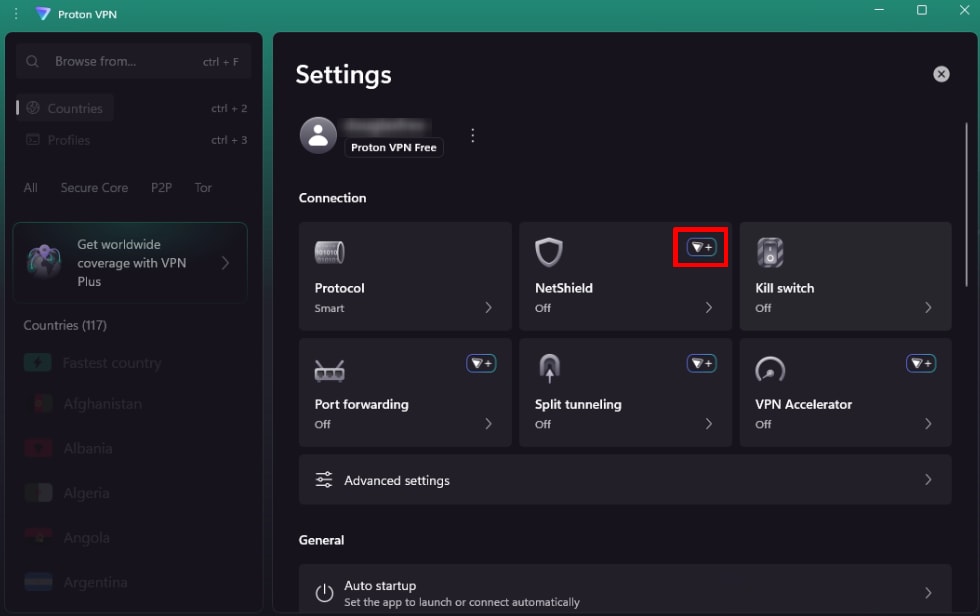
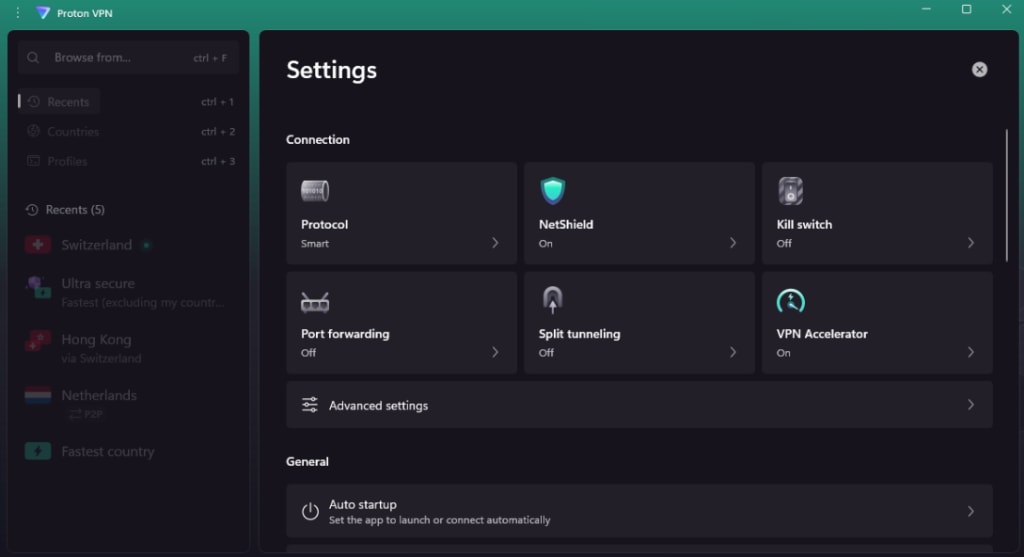
Nastavení Proton VPN
Vyberte ⚙ Nastavení pro přístup k pokročilejším nastavením a funkcím aplikace Proton VPN pro Windows. Pro usnadnění jsme na stránce Domů připravili také zkratky k některým z těchto pokročilých funkcí.
Nyní můžete konfigurovat nastavení aplikace Proton VPN a její pokročilé funkce.
Váš účet Proton VPN
Kliknutím na svůj účet Proton VPN můžete:
- Spravovat svůj účet (otevře se stránka account.protonvpn.com ve vašem výchozím webovém prohlížeči)
- Odhlásit se
- Ukončit aplikaci
Připojení
- Protokol
- NetShield Ad-blocker
- Kill switch a pokročilý Kill Switch
- Přesměrování portu
- Split tunneling
- VPN Accelerator
Pokročilá nastavení:
- Vlastní servery DNS
- Typ NAT
- Síťový ovladač OpenVPN (TUN nebo TAP – toto nastavení byste měli nechat beze změny, pokud přesně nevíte, co děláte)
- Deaktivovat síťový provoz IPv6
- Alternativní směrování(nové okno)
- Povolit připojení LAN
Obecné
- Automatické spuštění (nastavte, zda se aplikace automaticky připojí při spuštění systému Windows a zda se automaticky připojí při spuštění aplikace)
- Výchozí připojení (přizpůsobte si, co se stane po kliknutí na tlačítko Připojit)
- Upozornění (nastavte si, zda chcete dostávat upozornění z naší aplikace)
- Jazyk (vyberte si preferovaný jazyk)
- Motiv (tmavý, světlý nebo podle výchozího motivu systému)
- Přístup k beta verzi
- Automatické aktualizace
Podpora
- Centrum podpory (otevře stránky podpory Proton VPN ve vašem prohlížeči)
- Nahlásit problém
- Záznamy ladění (pracovníci naší zákaznické podpory si je mohou vyžádat, aby pomohli vyřešit potíže)
- O aplikaci (číslo verze aplikace, informace o licencování a přehled změn)
- Vývojářské nástroje (neměňte je, pokud přesně nevíte, co děláte)
Zlepšit Proton
Dole na stránce najdete tlačítko Obnovit výchozí nastavení, které obnoví výchozí nastavení aplikace.