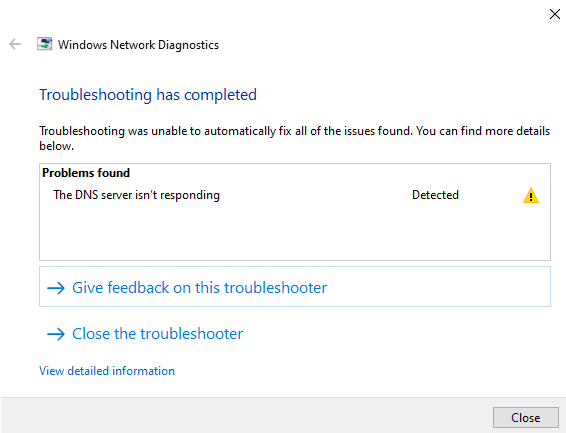
When trying to connect to a website, you may encounter a connection error. On Windows 10, if you run the Windows Network Diagnostics(nuova finestra) troubleshooting tool, it may return a DNS server not responding error. Windows 11 returns the less helpful [Your internet connection] doesn’t have a valid configuration error, where a DNS server issue may be one of several possible causes. On macOS and Linux, there’s no specific error message, but checking for DNS server issues should an important step in your troubleshooting process.
Fortunately, whether the problem is with your DNS server or device, there are steps you can take to resolve most DNS server issues. In this article, we discuss:
- What does DNS server not responding mean?
- How to fix a DNS server isn’t responding error
- How to change your DNS settings on Windows 10
- How to change your DNS settings on Windows 11
- How to change your DNS settings on macOS
- How to change your DNS settings on Linux
What does DNS server not responding mean?
Every connection to the internet is assigned a unique numerical identifier known as an internet protocol (IP) address. The human brain isn’t designed to remember long strings of numbers, so we identify internet resources (such as websites) using more human-friendly text strings known as domain names.
The Domain Name System (DNS) is like a global telephone directory that translates human-friendly URLs to the IP addresses that computers use.
For example, the URL protonvpn.com currently maps to the IP address 185.159.159.140.
DNS resolution is the process of translating a domain to its matching IP address and is performed by DNS servers, which by default are operated by your internet service provider (ISP). A DNS server error means something has gone wrong with this process.
How to fix a DNS server isn’t responding error
As we’ve already mentioned, Windows 10 will let you know if you have a DNS issue. On other platforms, troubleshooting DNS issues is part of the wider process of elimination required to identify a connection problem. To fix a DNS server isn’t responding error, try the following steps:
1. Use a VPN
When you use a VPN (such as Proton VPN), DNS queries are sent through the VPN tunnel to be resolved by the VPN provider’s DNS servers instead of the default DNS server configured in your Windows settings. Using a VPN is therefore an easy way to bypass issues with both the DNS server (since you’re changing the DNS server) and with your Windows DNS settings (as it is the VPN server resolving your DNS queries, not the server configured on Windows). The only downside to this approach is that it may not help you to identify the underlying problem.
It’s worth noting that Proton VPN now offers a custom DNS feature on some platforms that allows you to specify a third-party DNS service to resolve your DNS queries while connected to the VPN.
Learn more about Proton VPN’s custom DNS feature
2. Troubleshoot internet connection problems
A faulty or slow internet connection can prevent your device from reaching the DNS server. Connecting to a completely different network, such as to a WiFi hotpot from your phone, is a good way to identify if this is the issue. If it is, simply rebooting your modem and router (which are often the same device) can resolve the problem. If you don’t have a second network to connect to, you can just try resetting your modem and router.
If the problem lies with your internet connection, the chances are that simply waiting a little while for your to ISP to fix the problem will resolve it. If not, you may need to contact your ISP.
3. Change your DNS server
The DNS server you’re using (which by default is run by your ISP) might be experiencing technical difficulties or be overwhelmed with requests. Actually fixing a DNS server issue is up to whoever runs the DNS server, but what you can do is simply change the DNS server you use. See below for more details.
4. Check your DNS settings
It’s possible that your DNS settings are misconfigured in some way. They may be outdated, you may have incorrectly configured them, or a third-party software on your system may have changed them (this could potentially include malware, so if in any doubt, scan your system thoroughly).
The process for checking your DNS settings is basically the same as for changing your DNS server (see below for more details).
5. Turn off your firewall and antivirus software settings
Overly restrictive firewall or antivirus settings might block the connection to your DNS server. You don’t want to turn these off permanently, but temporarily turning them off will allow you to identify if they’re the cause of your problem.
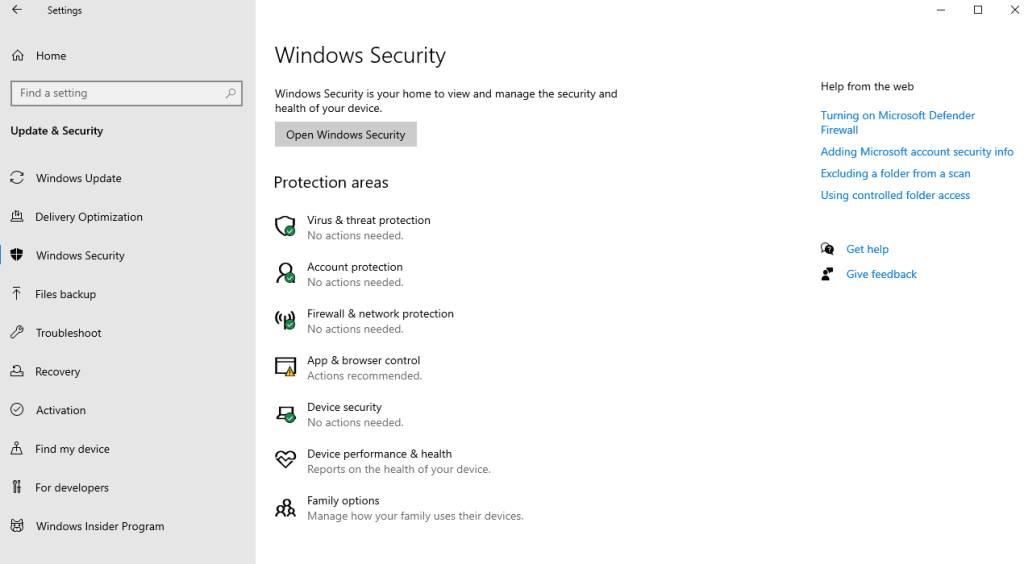
To find the default Windows 10 Virus & threat protection and Firewall & network protection settings, go to Start → Settings → Update & Security → Windows Security. On Windows 11, go to Start → Settings → Privacy & Security → Windows Security.
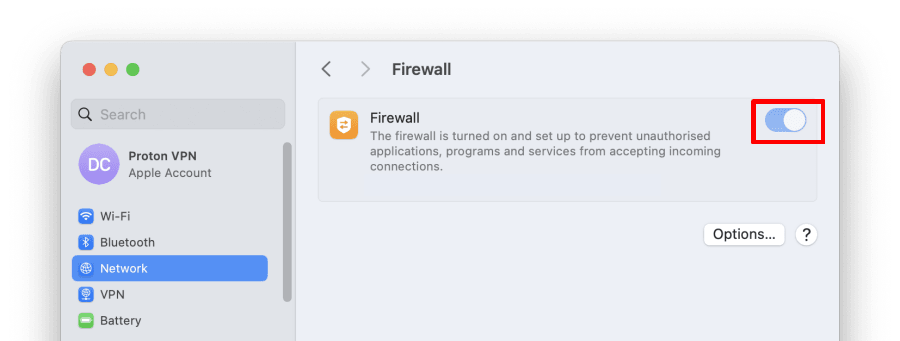
macOS doesn’t include(nuova finestra) default virus protection, but you can turn off its firewall by going to System Settings → Network → Firewall.
Most Linux distros also don’t have default virus protection by default, but many run a firewall. A good guide to turning off the default firewall on popular Linux distributions can be found here(nuova finestra). If you use third-party security software, please consult its documentation.
6. Flush your DNS cache
A corrupted DNS cache can prevent proper domain resolution, as can incorrect or outdated DNS settings. Clearing your Windows DNS cache can therefore resolve issues.
7. Restart your device in Safe Mode
Boot your device in Safe Mode with networking enabled(nuova finestra) (Windows), Safe Mode(nuova finestra) (macOS), or Recovery Mode with networking enabled (details will vary by distribution, but these instructions(nuova finestra) should work for most systems that use the GRUB boot loader) to see if third-party software is causing the issue. If it works in Safe Mode, investigate recent apps that you’ve installed or updated.
How to change DNS server or check your DNS settings
One of the most important troubleshooting steps you can take is to look at your system’s DNS settings. This will allow you to check they are correct or input new settings to change your DNS service.
Windows 10
1. Go to Start → Settings → Network & Internet → your network interface (e.g. WiFi or Ethernet) → Advanced network settings → Change adapter settings.
2. Right-click on your network interface → Properties → Internet Protocol Version 4 (TCP/IPv4) → Properties.
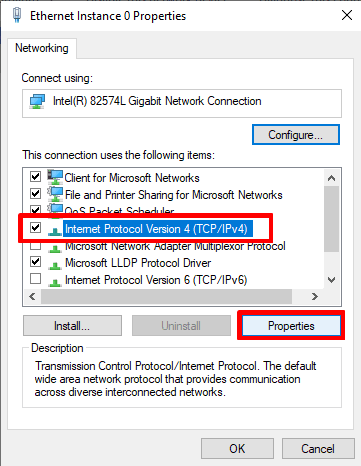
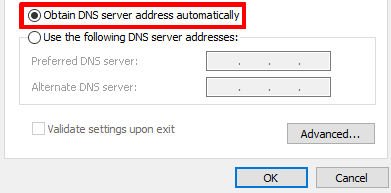
- The Obtain DNS server addresses automatically setting tells Windows to use your ISP’s DNS server and is the default setting. If you’re using custom DNS settings, simply selecting this option may fix (or at least help you troubleshoot) the problem. Click OK when you’re done.
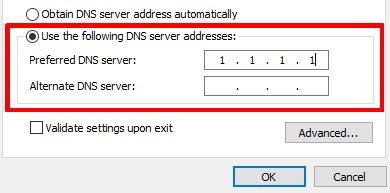
To change your DNS server or check your existing custom DNS settings, select Use the following DNS server address and enter or verify the address of the DNS server or service you wish to use (Cloudflare’s 1.1.1.1 DNS service is a fairly privacy-friendly and easy to remember option).
Note that only a Preferred DNS server address is required, although its a good idea to add an alternative address for fallback purposes.
4. If you have an IPv6 connection (or if you’re not sure if you do), repeat steps 2 and 3 for Internet Protocol Version 6 (TCP/IPv6).
Windows 11
1. Go to Start → Settings → Network & Internet → select your network interface (e.g., WiFi or Ethernet).
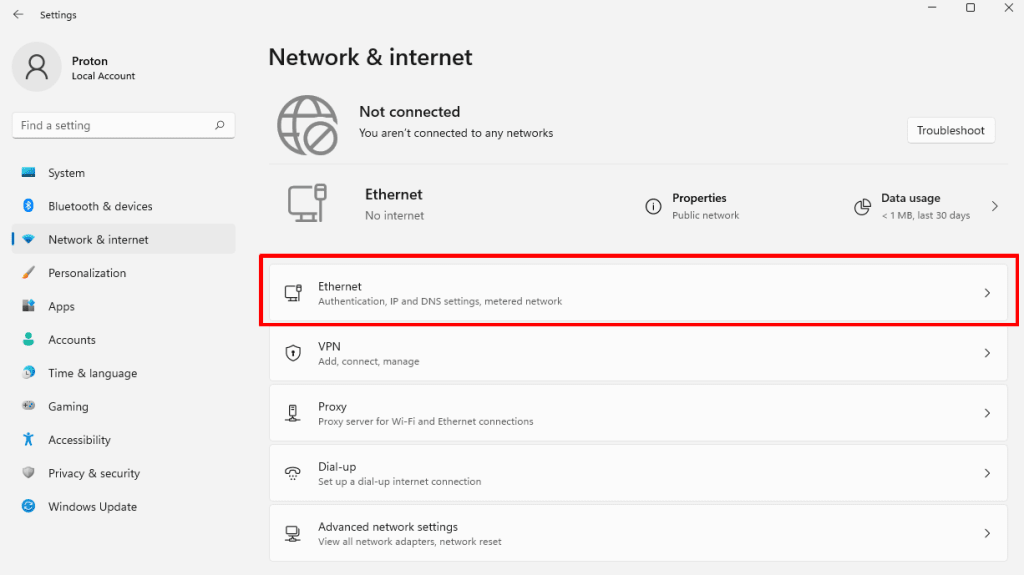
2. Go to DNS server assignment → Edit.
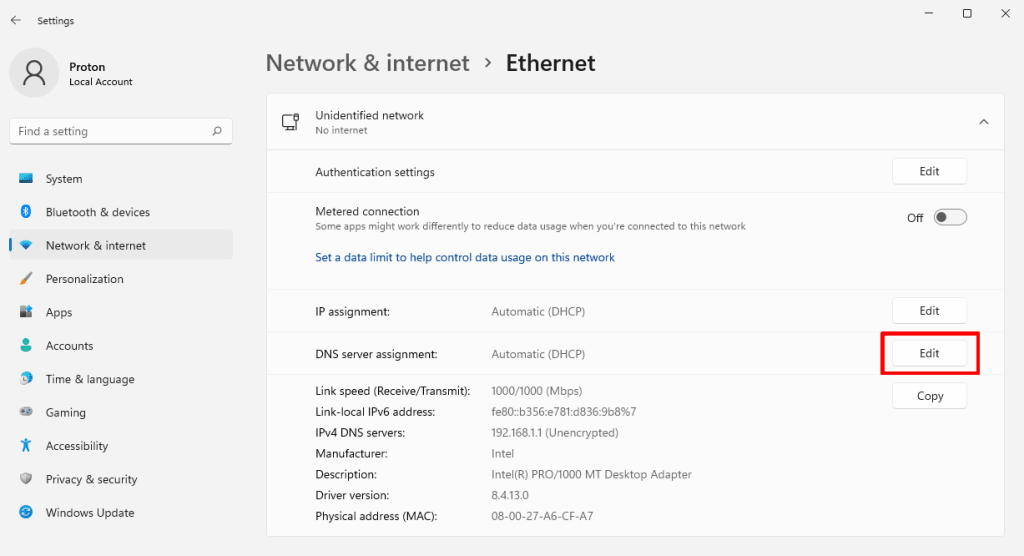
3. If you’re using custom DNS settings, simply selecting Automatic (DHCP) from the dropdown menu may fix (or at least help you troubleshoot) the problem. Click Save when you’re done.
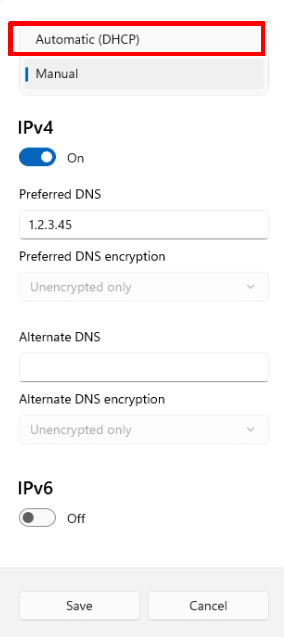
To change your DNS server or check your existing custom DNS settings, select Manual from the dropdown menu. Now go to IPv4 → Preferred DNS and enter or verify the address of the DNS server or service you wish to use (Cloudflare’s 1.1.1.1 DNS service is a fairly privacy-friendly and easy to remember option).
Note that only a Preferred DNS server address is required, although its a good idea to add an alternative address for fallback purposes.
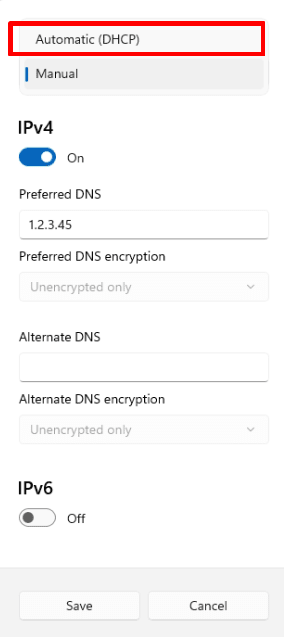
4. If you have an IPv6 connection (or if you’re not sure if you do), repeat step 2 for IPv6.
macOS
- Open the Settings app and go to Network → select your network interface (e.g., WiFi or Ethernet) → Details… → DNS tab. From here, you can easily review your DNS settings.
- If you’re using custom DNS settings, simply removing them so that your Mac uses your ISP’s DNS server may fix (or at least help you troubleshoot) the problem. To do this, select any third-party DNS servers and click the – button to remove them. Click OK when you’re done.
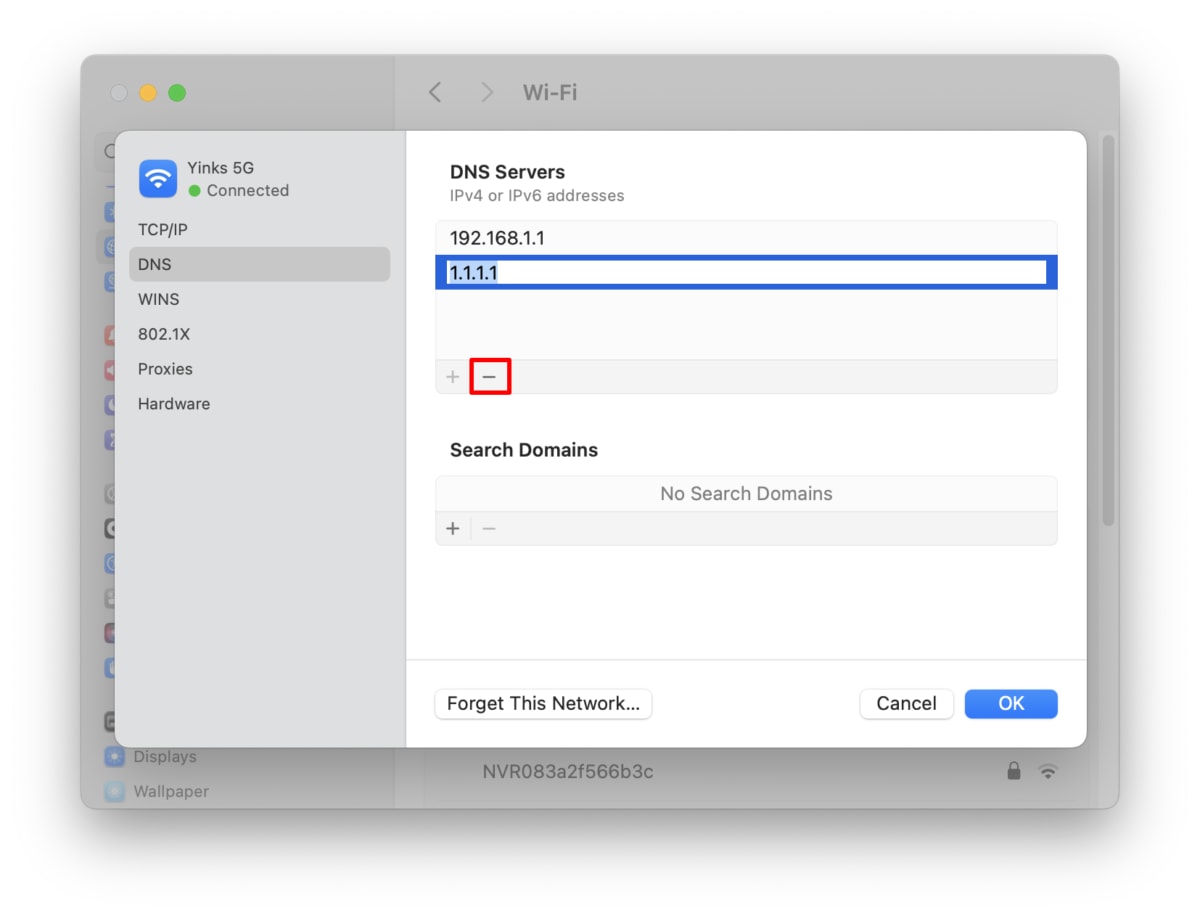
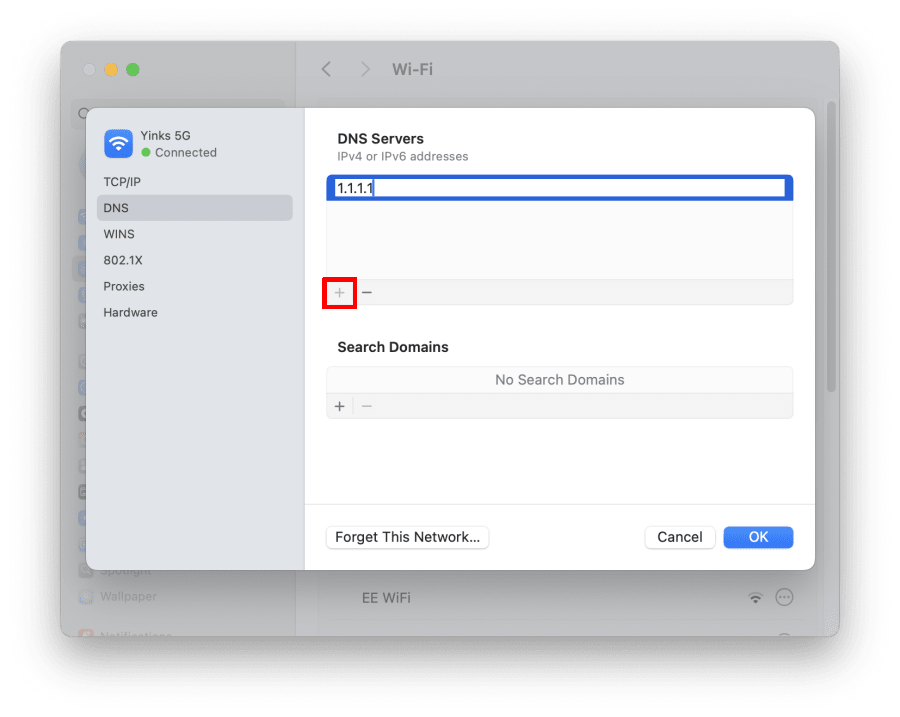
To change your DNS server, first remove any existing custom server addresses (if any). Then click the + button and enter the address of the DNS server or service you wish to use (Cloudflare’s 1.1.1.1 DNS service is a fairly privacy-friendly and easy to remember option).
If you wish, you can add more DNS server addresses that macOS will fall back on in the order listed. Click OK when you’re done.
Linux
Each Linux distro and desktop environment offers a different (although often very similar) user interface for changing DNS settings. In Ubuntu GNOME, for example:
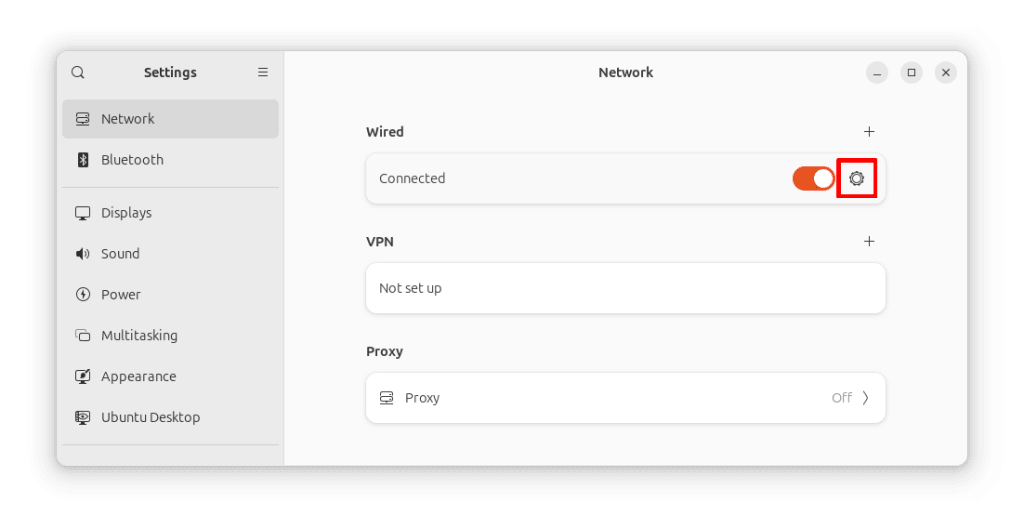
1. Go to Show Apps → Settings → Network and click the gear icon next to your network interface.
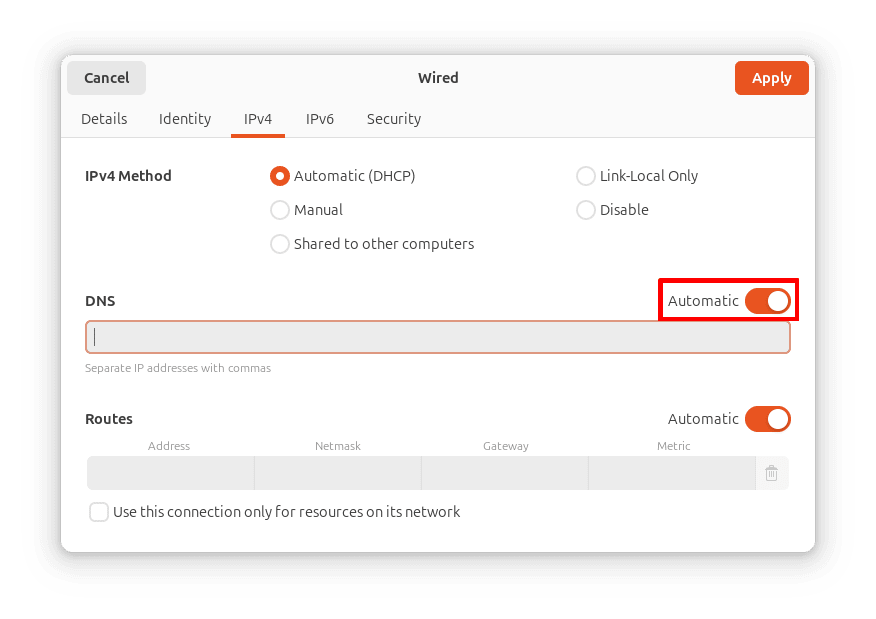
2. Go to the IPv4 and IPv6 tabs. From here, you can easily review your DNS settings. If you’re using custom DNS settings, simply removing them so that your PC uses your ISP’s DNS server may fix (or at least help you troubleshoot) the problem.
To do this, delete any existing DNS entries and toggle the Automatic switch on. Click Apply when you’re done.
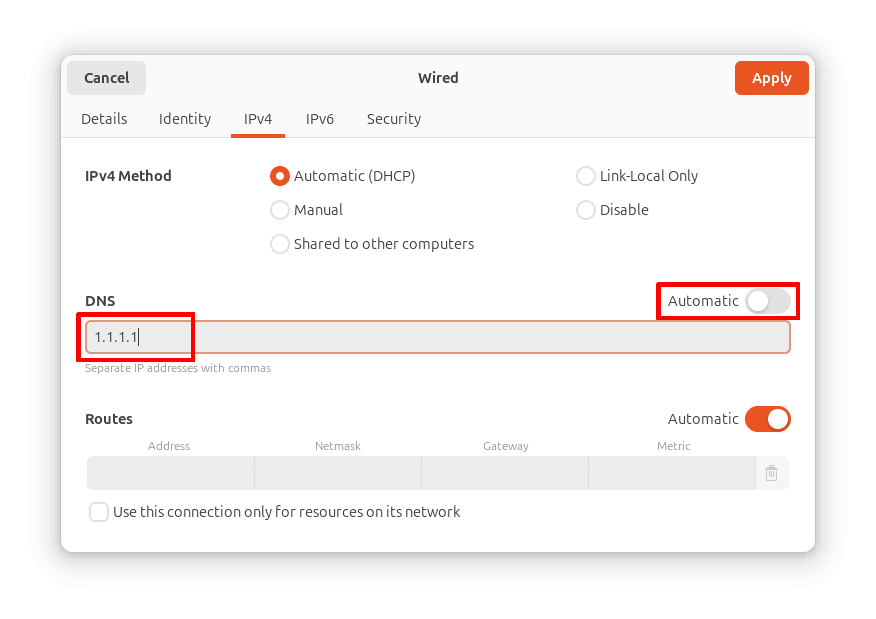
To change your DNS server, first remove any existing custom server addresses. Then toggle the Automatic switch on (if it isn’t already) and enter the address of the DNS server or service you wish to use (Cloudflare’s 1.1.1.1 DNS service is a fairly privacy-friendly and easy to remember option).
If you wish, you can add more DNS server addresses (separated by a comma) that Linux will fall back on in the order listed. Click Apply when you’re done.
Changing DNS setting on Linux is a case where its generally easier to use a GUI than the command-line. If you prefer to use the command-line, you can easily edit the /etc/resolv.conf file, but on most Linux systems (those running systemd(nuova finestra)), any changes you make will disappear when you reboot your system.
To change your DNS setting permanently, you’ll need to use the nmcli command. See here(nuova finestra) for a guide guide on this.
Final thoughts: Most “DNS server not responding” errors can be fixed
A DNS server issue can be annoying, but troubleshooting the cause is a simple step-by-step process of elimination, and in most cases it will be something you can easily fix yourself, allowing you to quickly get back online.


