
Port forwarding on a router allows you to configure a private network to be accessible from the internet. It can help you connect to your home network from another location or provide secure access to someone else. And you can accomplish this by opening ports and setting up rules to forward ports.
While this might seem intimidating at first, it becomes fast and easy once you understand how it works. Once you learn, you’ll be able to play games with your friends using P2P, remotely access your home computer while traveling, or improve your downloading and uploading speed when using a torrent client.
This article explains the basics of port forwarding on a router, how it works, and the different types you can use to optimize your network. It also shows how to open ports on various routers, and how to port forward a Minecraft server
However, please be aware that if you’re using a VPN, port forwarding on your router does nothing. This is because a VPN encrypts your internet traffic between your device and the destination. This means the router can’t see your traffic, and therefore can’t forward it.
Instead of incoming traffic being filtered by your route’s firewall, when you use a VPN, its filtered by a firewall running on the VPN server. To port forward through this firewall when using Proton VPN, you need to enable port forwarding on our Windows or Linux apps, or enable it manually on third-party VPN apps.
- What is a port?
- What is port forwarding on a router and what does it do?
- What are the benefits of port forwarding on a router?
- How to open ports on a router
- How to port forward a Minecraft server
- What is VPN port forwarding?
- Securely port forward with Proton VPN
What is a port?
A port is a virtual point on a device that allows it to send and receive data over a network. Each port is associated with an IP address and has a unique number. While the IP address directs internet traffic to the correct device, the port number ensures it reaches the right application or service on that device. For example, web traffic typically uses port 80 for HTTP or port 443 for HTTPS, which is used by traffic emitted by your device’s web browser.
What is port forwarding on a router and what does it do?
Port forwarding (also called port mapping) is a networking technique that allows external devices on the internet to communicate with specific devices or services within a private network, such as your home network.
Most devices on a home network can’t be directly accessed from the internet due to the router’s firewall. For example, if you have a security camera at home, someone on the internet can’t connect to it directly because the router blocks these incoming connections by default to prevent unauthorized access.
However, if you want to access your security camera remotely (from your smartphone, for example), you can set up port forwarding in advance to route the camera’s feed to your smartphone over the internet by directing it through an open port. Opening a port allows incoming traffic through the firewall, but that’s not enough because the router doesn’t know which device or service on your network that traffic should go to. That’s where port forwarding comes in — it maps that incoming traffic to the correct internal device.
While opening a port is risky, the port forwarding rules you set ensure that only traffic on specific ports is allowed through the firewall, so other devices in your home network aren’t exposed. Always use strong passwords(nové okno) for both your camera and router, and make sure to enable encryption like WPA3 on your wireless network.
Practical example
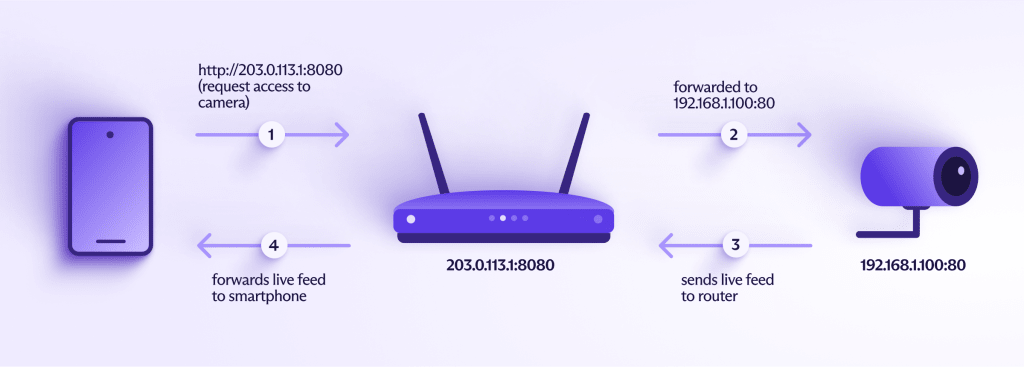
Let’s assume you want to access your security camera’s live feed from your smartphone when you’re away from home. Your home router has the 203.0.113.1 external IP, and the security camera has the 192.168.1.100 internal IP.
To set up port forwarding, you need to log in to your router’s admin interface, locate the port forwarding section, set port 8080 over TCP on the external IP address to receive inbound traffic, and map it to internal IP 192.168.1.100 and port number 80 of the security camera. Additionally, you assign the 192.168.1.100 static IP address to the security camera to make sure you can always remotely access camera footage without having to update port forwarding rules. (Note: This example is illustrative only.)
When you’re away from home and want to view the security camera feed, you can open a web browser or an app on your smartphone and enter the http://203.0.113.1:8080 address.
What are the benefits of port forwarding on a router?
Port forwarding is typically used for P2P gaming, torrenting, and remote working. Here are some scenarios when it can help you:
- Host an online game server for friends, allowing them to join and play without issues, even if they are on different networks.
- Access your home computer while traveling to retrieve files, run applications, or manage your network.
- Stream your home media server’s content remotely by enabling access to your music, movies, and photos.
- Ensure your web server, FTP server, or any other type of server hosted on your home network is accessible to users on the internet.
- Enable remote surveillance by accessing your home security cameras from anywhere in the world.
- Make file sharing faster and more reliable when torrenting by configuring port forwarding to improve download and upload speeds.
How to open ports on a router
Before starting, make sure to connect your computer to your router via WiFi or Ethernet cable for accessing its admin panel. If you’re unsure about the login credentials, try the default username and password, which are usually admin and password (or admin), but you can check your router’s support page to make sure.
You will also need the local IP address assigned to the device that you want to use providing remote access. After opening a port, you can use an online port checking tool to verify that it worked.
Netgear
- Visit http://192.168.1.1 and log in.
- Go to Advanced > Advanced setup > Port Forwarding/Port Triggering.
- Select Port Forwarding and click Add Custom Service.

- Enter a Service Name (something descriptive like “Minecraft server”).
- Select the Service Type (TCP, UDP, or TCP/UDP). If you’re unsure, select TCP/UDP.
- Set the External Starting Port and External Ending Port to the port on the router that the outside world connects to (for example, ports 443 and 8443). For a single port, enter the same number in both fields. Otherwise, you can set a range of ports.
- Enter the Internal IP Address of the device you want to forward ports to. This is typically the IP address of your computer or gaming console.

- Click Apply to save the settings.
Asus
- Visit http://192.168.1.1 and log in.
- In the Advanced Settings menu, go to WAN > Virtual Server/Port Forwarding.
- Switch the button to Enable Port Forwarding.

- Click Add Profile.
- Enter a Service Name to identify the rule.
- Specify the Port Range you want to open. You can enter a single port or a range of ports.
- Enter the Local IP address of the device you’re forwarding the ports to.
- Set the Protocol to TCP, UDP, or Both.

- Click Add or Apply to save the settings.
TP-Link
- Visit http://192.168.1.1 and log in.
- Navigate to NAT Forwarding > Virtual Servers.
- Click Add.

- In the Service Port field, enter the port number or range of ports you want to open.
- In the Internal IP field, enter the static IP address of the device you’re forwarding the ports to.
- Select the protocol used by the service (TCP, UDP, or ALL).
- Set the status to Enabled.

- Click Save to apply the settings.
Arris
- Visit http://192.168.1.1 and log in.
- Go to Firewall > Virtual Servers and click Add.

- Set the rule name at Description.
- At Inbound port, enter the port you want to open for external access. You open a range of ports or a single one by entering the same number in both fields..
- Set Format to TCP, UDP, or Both. If you’re unsure, select Both.
- Set Private IP address to the internal IP address of the device that will be hosting the server.
- At Local Port, specify the port on the local device that will be receiving the traffic.

- Click Add Virtual Server to confirm modifications and check the rule box to enable it.
How to port forward a Minecraft server
Follow these general steps to configure port forwarding for Minecraft on most routers. For specific router instructions, see the guides listed above:
- Visit your router’s admin panel at 192.168.1.1 or 192.168.0.1 and log in.
- Navigate to the port forwarding section.
- Give the rule a name, such as Minecraft Server.
- Enter your computer’s local IP address (the one you use to host the game server).
- If you’re using Minecraft Java edition, select TCP/UDP protocols and enter 25565 for both the internal and external port.
- For Minecraft Bedrock edition, select TCP and enter 19132 for the internal and external port. For this Minecraft version, you have to create a second rule to select UDP and enter port 19133.
- Save the rule and make sure it’s enabled.
- Restart your Minecraft server.
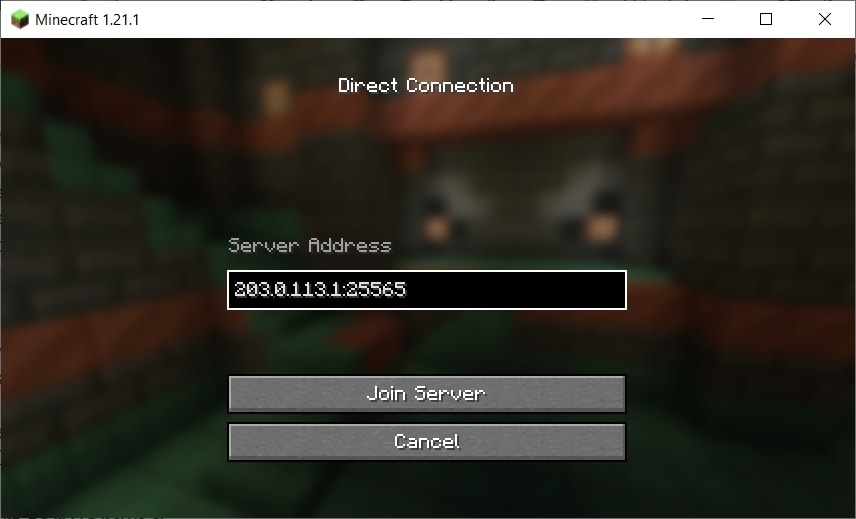
Your friends can now connect to your game by entering your public IP address and port. For example, for public IP 203.0.113.1 and port 25565, they can use 203.0.113.1:25565.
To enable port forwarding for hosting a Minecraft server, it’s important to understand the networking requirements.
- By default, Minecraft Java Edition uses port 25565 (TCP/UDP), while Minecraft Bedrock Edition uses ports 19132 (TCP) and 19133 (UDP). You can typically use these default ports without problems, but if needed, you can change them in the server.properties file located in the game installation directory.
- Depending on your Minecraft edition, these ports must be allowed through your firewall, or any connection attempts from outside players will be blocked.
- The server host should have a static internal IP address or dynamic DNS to ensure that it remains accessible even if the internal or external IP address changes.
What is VPN port forwarding?
When using a VPN, your data is encrypted between your device and its destination (such as a game server or P2P peer). This means its encrypted as it passes through your router, thus preventing your router from port forwarding (or otherwise interacting with) it.
Port forwarding on your router is therefore incompatible with using a VPN. However, without a VPN, your real IP address is exposed to the internet.
Because bypassing your router’s firewall is potentially dangerous, most VPN services (including Proton VPN) implement a firewall on the VPN servers. This serves a very similar function to the firewall on your router, so as with a router, you might want to port forward through it.
This what VPN port forwarding is for.
Securely port forward with Proton VPN
Proton VPN supports port forwarding on our official Windows and Linux apps (some manual configuration is still required on Linux). You can also manually configure port forwarding using third-party VPN apps.
Proton VPN supports high-speed connections(nové okno) up to 10 Gbps and the lightweight WireGuard(nové okno)® protocol. Plus, our unique VPN Accelerator(nové okno) technology further improves your speeds by up to 400%, especially over long distances or unstable connections.
Based in Switzerland(nové okno) and primarily owned by a nonprofit(nové okno), we have a strict no-logs policy(nové okno) that regularly undergoes independent audits. All Proton apps are open source(nové okno), which means anyone can check our claims.
Sign up for a Proton VPN account to protect your privacy and encrypt your internet traffic when using port forwarding.


