How to set up Proton VPN on an OpenWrt router using WireGuard
- Leitura
- 7 min
- Categoria
- Routers
You can set up Proton VPN on your router, which will protect every device that connects to the internet using that router. In this guide, we take a step-by-step look at how to set up Proton VPN on an OpenWrt(nova janela) router using the WireGuard® VPN protocol.
You can also configure Proton VPN on an OpenWrt router using OpenVPN, but we recommend using WireGuard unless you have a strong reason to use OpenVPN.
We also have guides for setting up Proton VPN on a wide selection of other popular routers.
Before starting, you’ll need the following:
- A computer that’s connected to your LAN network so that you can access your OpenWrt router’s web interface(nova janela). To do this, enter 192.168.1.1 into your browser’s URL bar.
How to set up Proton VPN on an OpenWrt router
Step one: Download a WireGuard configuration file
Sign in to Proton VPN using your Proton Account username and password at account.protonvpn.com, go to Downloads → WireGuard configuration, and download a WireGuard configuration file. Be sure to Select Platform: Router.
Learn how to download a WireGuard configuration file from Proton VPN
Step 2: Install WireGuard support
1. Open the OpenWrt web interface, sign in, and go to System → Software → Actions → Update lists…
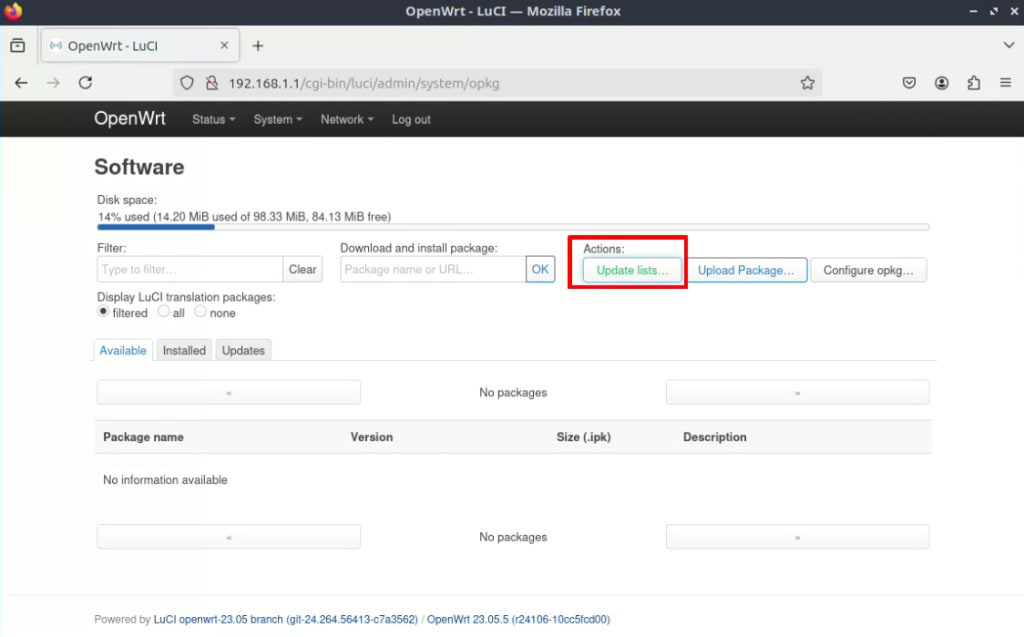
2. In the Filter field, enter WireGuard and select luci-proto-wireguard → Install from the package catalog search results (or luci-app-wireguard if you don’t see this package).

3. Turn your router off and then on again (you can do this through the web interface by going to System → Reboot).
Step three: Configure the WireGuard interface
1. Go to Network → Interfaces → Add new interface…
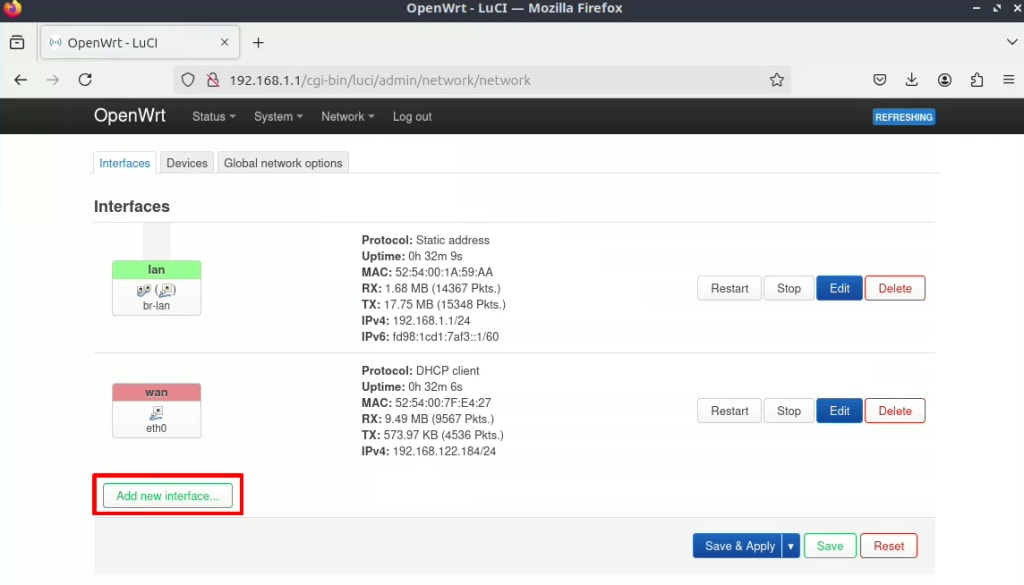
2. Give the new interface a name (such as proton0) and select WireGuard VPN from the Protocol dropdown menu. Click Create interface when you’re done.

3. Go to Import configuration → Load configuration…

4. Open the WireGuard configuration file you downloaded in step one in a text editor, and paste its contents into the text box. Click Import settings when you’re done.

5. On the new interface page, go to the Peers tab. Next to the only Imported peer configuration, click Edit.
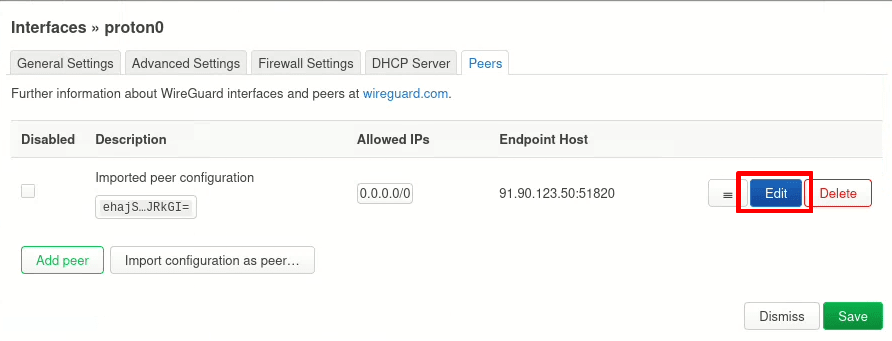
6. Go to Route Allowed IPs and ensure the checkbox is selected. Click Save.
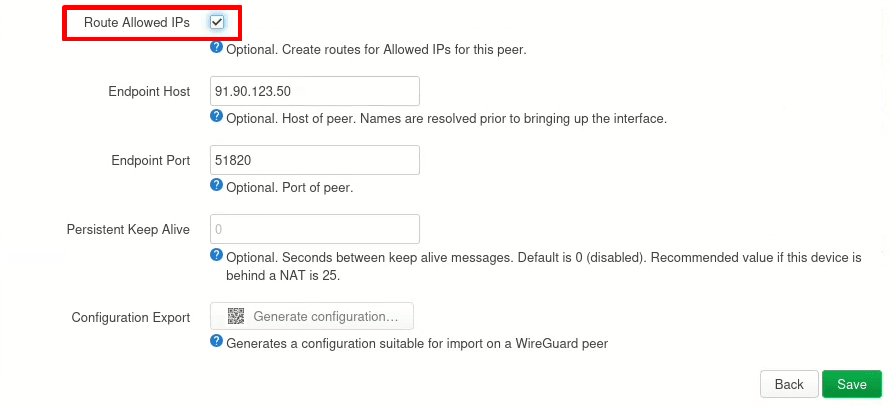
7. Back on the configuration page for your new WireGuard interface, click Save.
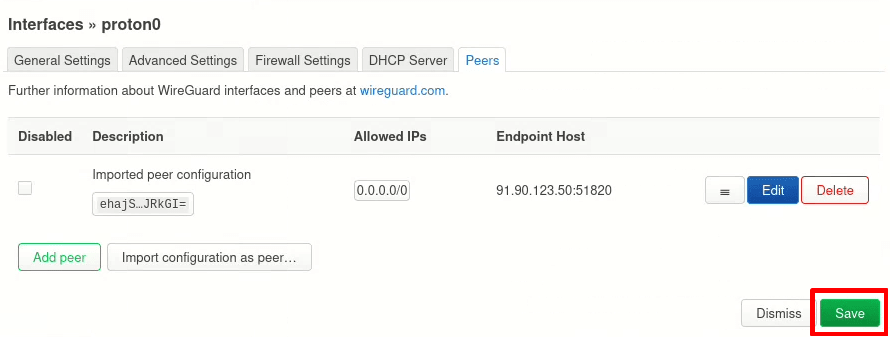
8. On the Interfaces page, click Save & Apply.

You’ll lose all internet connectivity through the router, as all traffic is routed through the new interface but the firewall is not configured yet.
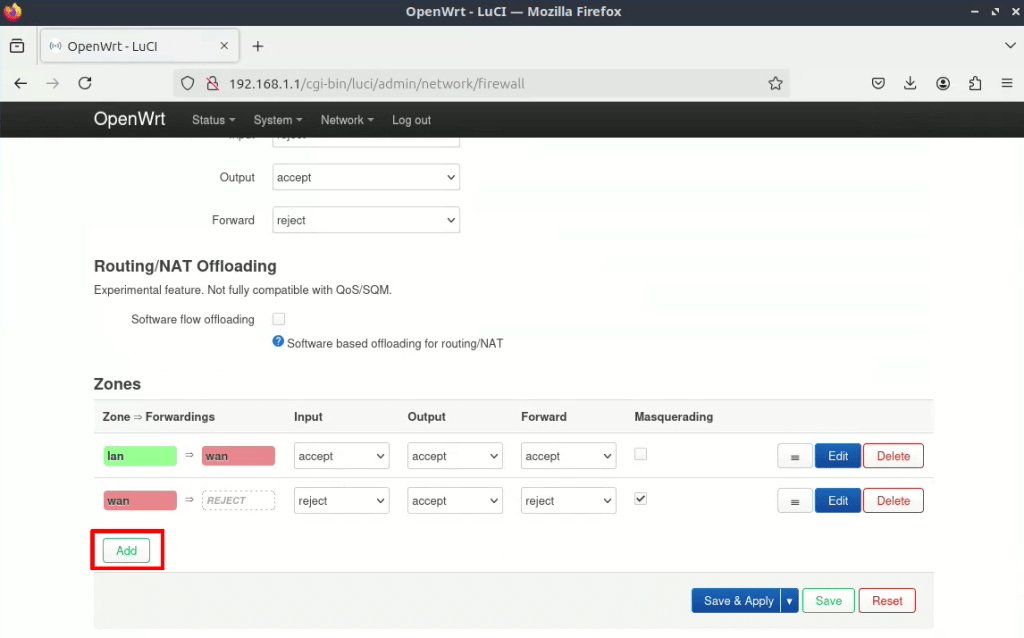
Step four: Configure the firewall
1. Go to Network → Firewall → Zones → Add.
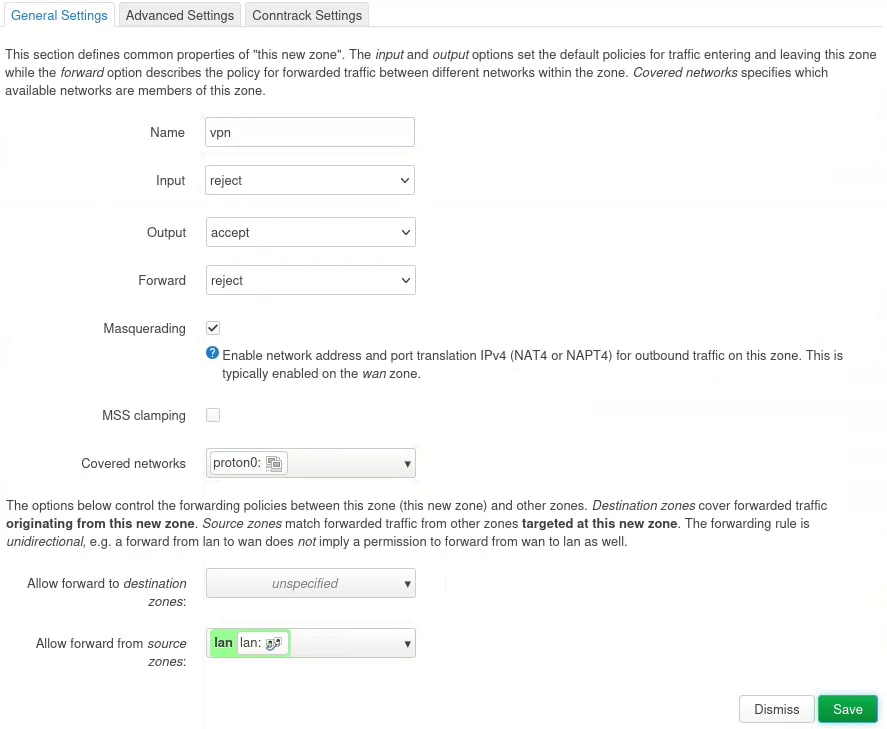
- Enter or select the following settings:
- Name: Choose a suitable name, such as vpn
- Input: Reject
- Output: Accept
- Forward: Reject
- Masquerading: Enabled
- Covered networks: Select WireGuard interface we created Step three (proton0 in our example).
- Allow forward from source zones: lan
3. Back on the Zones page, we need to edit the default LAN zone to ensure traffic is routed through the newly-created VPN zone. To do this, click Edit next to the lan zone.

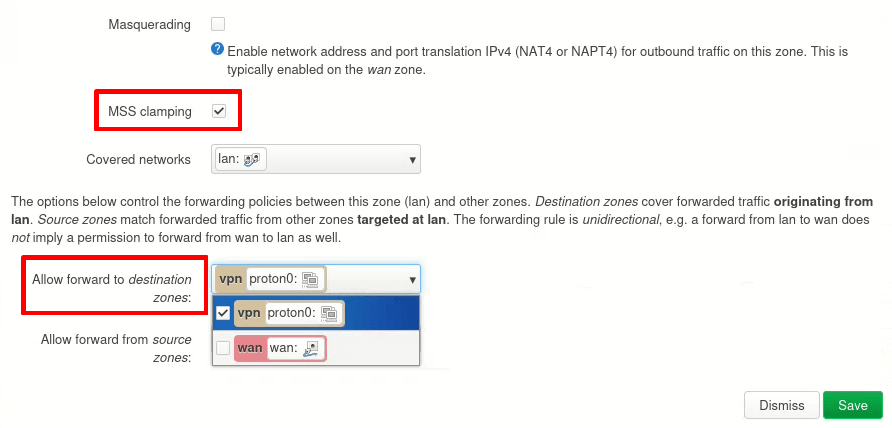
4. Ensure the MSS clamping checkbox is enabled, then go to Allow forward to destination zones and deselect all zones except the VPN zone you just created (vpn in our case). Click Save when you’re done.
Step four: Configure DNS
To prevent DNS leaks, we need to ensure that OpenWrt uses Proton VPN’s DNS server, not your ISPs.
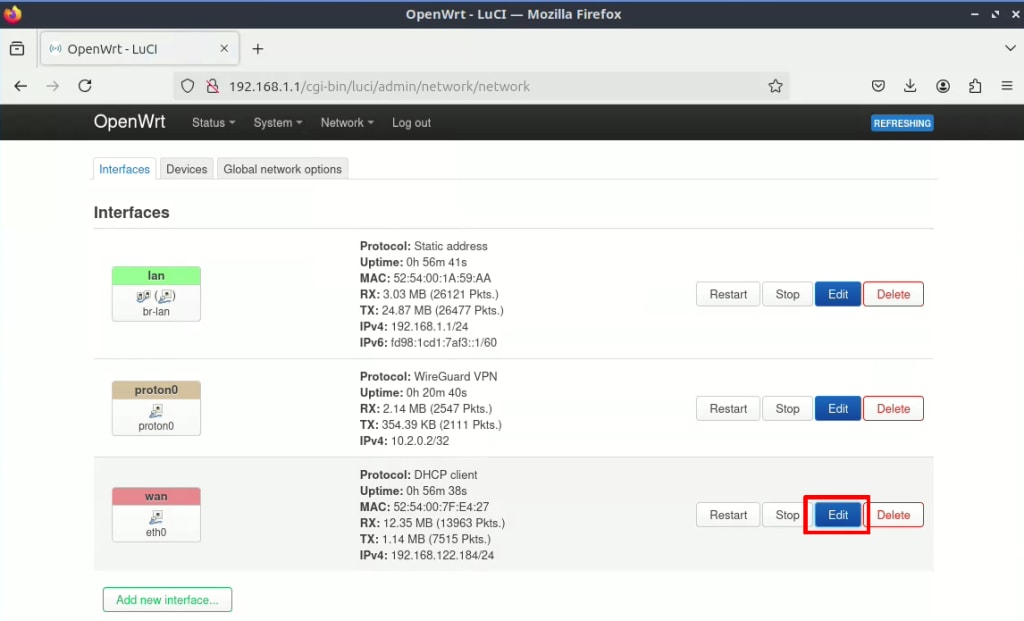
1. Network → Interfaces → wan → Edit.
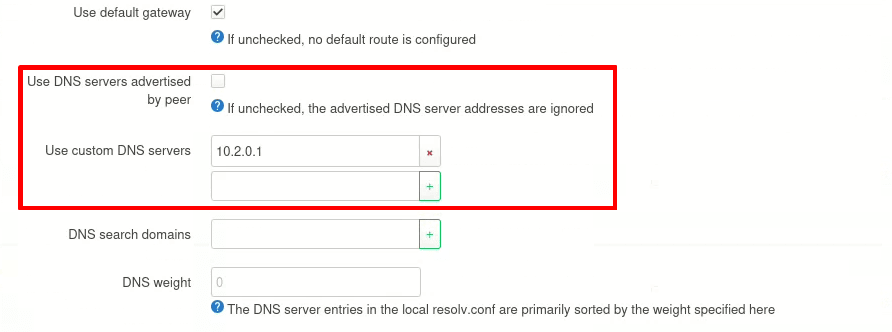
2. Go to the Advanced Settings tab → Use DNS servers advertised by peer and deselect the checkbox. A new Use custom DNS servers option will appear. Enter 10.2.0.1 (Proton VPN’s DNS server address) → +. Click Save when you’re done and, then Save & Apply back on the main Interfaces page.
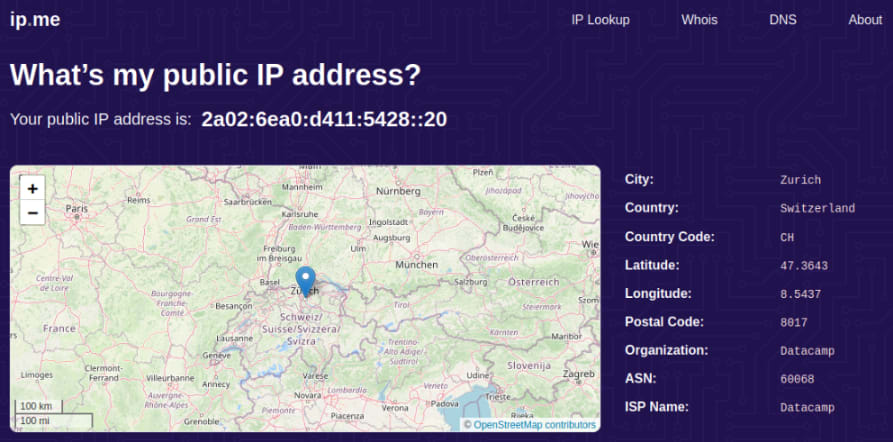
Your OpenWrt router is now configured to route all connections through the VPN server you chose in Step one. Visit our free secure IP scanner to check that the VPN is working correctly, and browserleaks.com/dns(nova janela) to ensure there are no DNS leaks.